Просмотр новости
Найдите то, что Вас интересует
 Спутники
 РН
РН SpaceX
 Роскосмос
 NASA
NASA
СпутникиРНSpaceXРоскосмосNASALearn how to protect WordPress forms from spam and malicious submissions with AbuseIPDB and the Gravity Forms AbuseIPDB Add-On.

Gravity Forms already gives you tons of tools to protect your forms from spam and malicious actors, including built-in anti-spam features and integrations with services like Cloudflare Turnstile, reCAPTCHA, Akismet, and others.
With the Gravity Forms Abuse IPDB Add-On, you can access yet another way to protect your forms by screening entries against AbuseIPDB’s crowd-sourced database of abusive IP addresses.
In this post, we’ll introduce you to what AbuseIPDB is and what the AbuseIPDB Add-On does.
Then, we’ll show you step-by-step how to set up the Gravity Forms AbuseIPDB Add-On to start protecting your forms from abusive IP addresses.
Let’s get into it…
What is AbuseIPDB?AbuseIPDB is a community-powered IP reputation database. You can see that in the name – it’s a database (DB) of abusive IP addresses. That is, IP addresses associated with malicious actions such as spam, hacking, DDoS attacks, etc.
Webmasters from around the world can report malicious IP addresses to AbuseIPDB. Based on those reports, each IP address gets a confidence score from 0-100. This score is recalculated daily and reflects details such as the number of reports and how recently it’s been reported (with older reports holding less weight).
AbuseIPDB has both free and paid plans, but most WordPress sites will be fine using the free plan.
What does the Gravity Forms AbuseIPDB Add-On do?With the Gravity Forms AbuseIPDB Add-On, you can integrate your forms with AbuseIPDB to help protect your site from spam or other malicious activity.
When someone submits a form on your site, Gravity Forms will use the AbuseIPDB API to check the IP address of the form submitter against AbuseIPDB.
After checking the IP address against AbuseIPDB, AbuseIPDB will send back a confidence score, which is a numerical representation of how likely the IP address is to be malicious/spammy in AbuseIPDB’s estimation.
The add-on then lets you set your own confidence threshold for whether the submission should be flagged or not. Essentially, this gives you the ability to control how strict your forms should be.
Here’s a quick rundown of some specific features that you’ll be able to access with the add-on:
Now, let’s shift gears and get into the actual step-by-step guide for how to set up the AbuseIPDB Add-On on your own site.
Below, we’ll cover every step in the process, including getting your AbuseIPDB API key, connecting Gravity Forms to AbuseIPDB, and setting up your own customized protection rules.
1. Install the AbuseIPDB Add-OnTo get started, you’ll want to install and activate the AbuseIPDB Add-On on the site where you’re using Gravity Forms.
The AbuseIPDB Add-On is available on every single Gravity Forms license. So, as long as you have an active license, you’ll have access to it.
If you don’t currently have a Gravity Forms license, you can purchase one here.
Assuming you’ve already installed the core Gravity Forms plugin and added your license key, here’s how to install the AbuseIPDB Add-On:
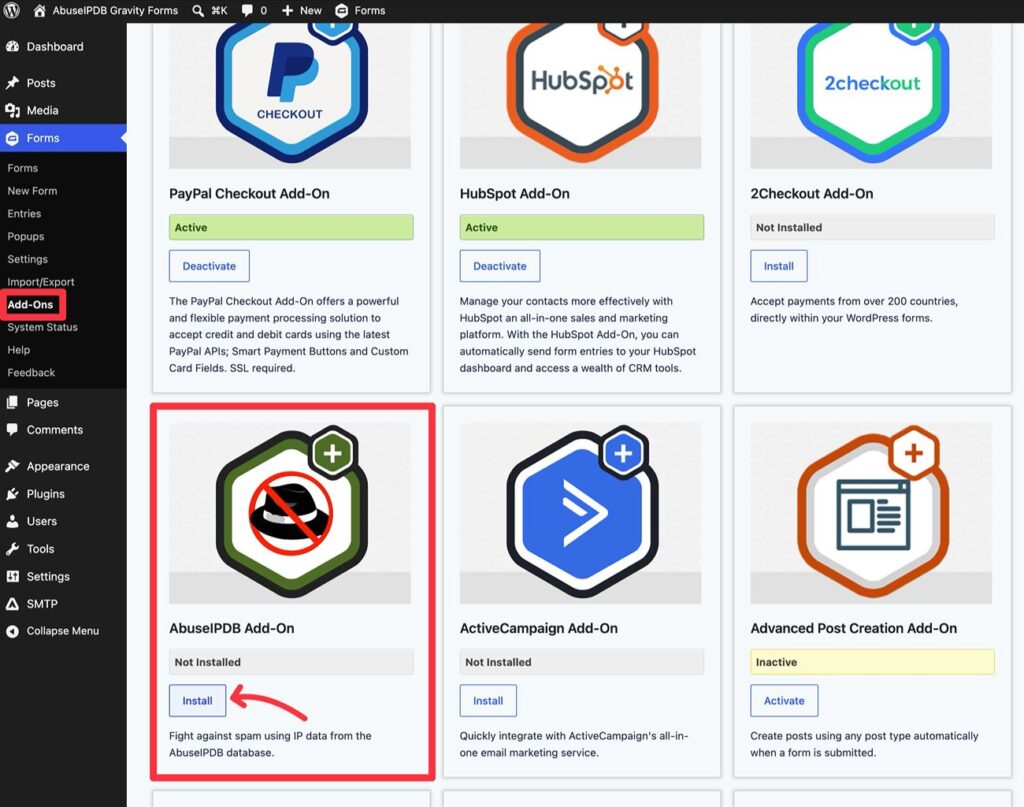 2. Register for a free AbuseIPDB account
To connect your site to AbuseIPDB, you’ll first need to register for an AbuseIPDB account, which will allow you to create an API key in the next step.
This API key will be free to use for most WordPress sites. With the free key, you already get 1,000 IP checks/reports per day. That is, you can check 1,000 form submissions per day, which is more than enough for most sites.
If you need to exceed that, the Basic plan supports 10,000 daily checks starting at $19 per month.
To create your free account, you can click this link or click Register Now For An API Key on the AbuseIPDB homepage.
3. Create your AbuseIPDB API keyOnce you’ve registered for an account, you need to create an AbuseIPDB API key, which is what Gravity Forms will use to connect to the service.
Open the AbuseIPDB dashboard and go to My API → Keys. Or, you can click this link to go straight to the page.
Give your API key an internal name – e.g. “Gravity Forms”. Then, click Create.
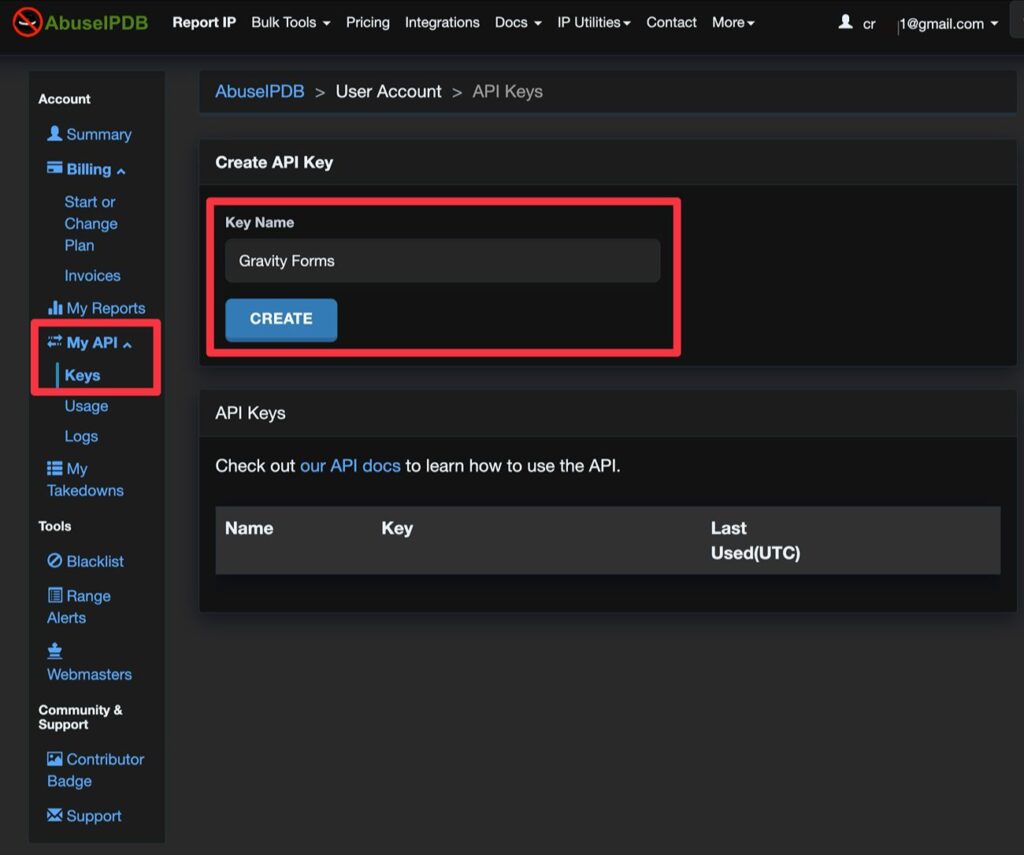
You should then see the API key appear under the API Keys heading. Copy the value of your API key to a safe spot because you’ll need it in the next step.
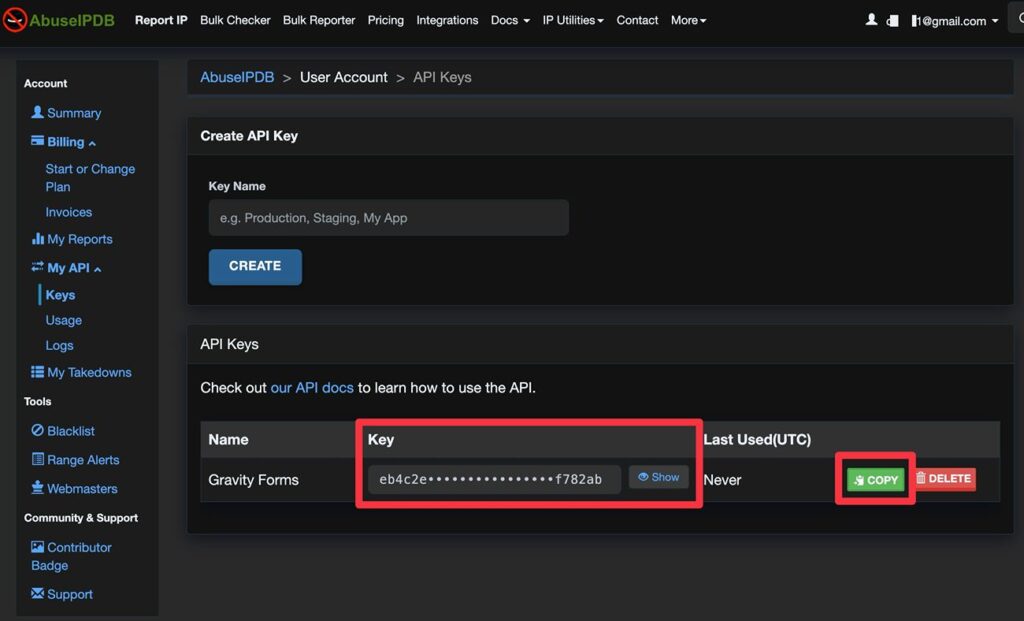 4. Connect Gravity Forms to AbuseIPDB and configure settings
Once you have your API key copied to a safe spot, you’re ready to connect Gravity Forms to AbuseIPDB:
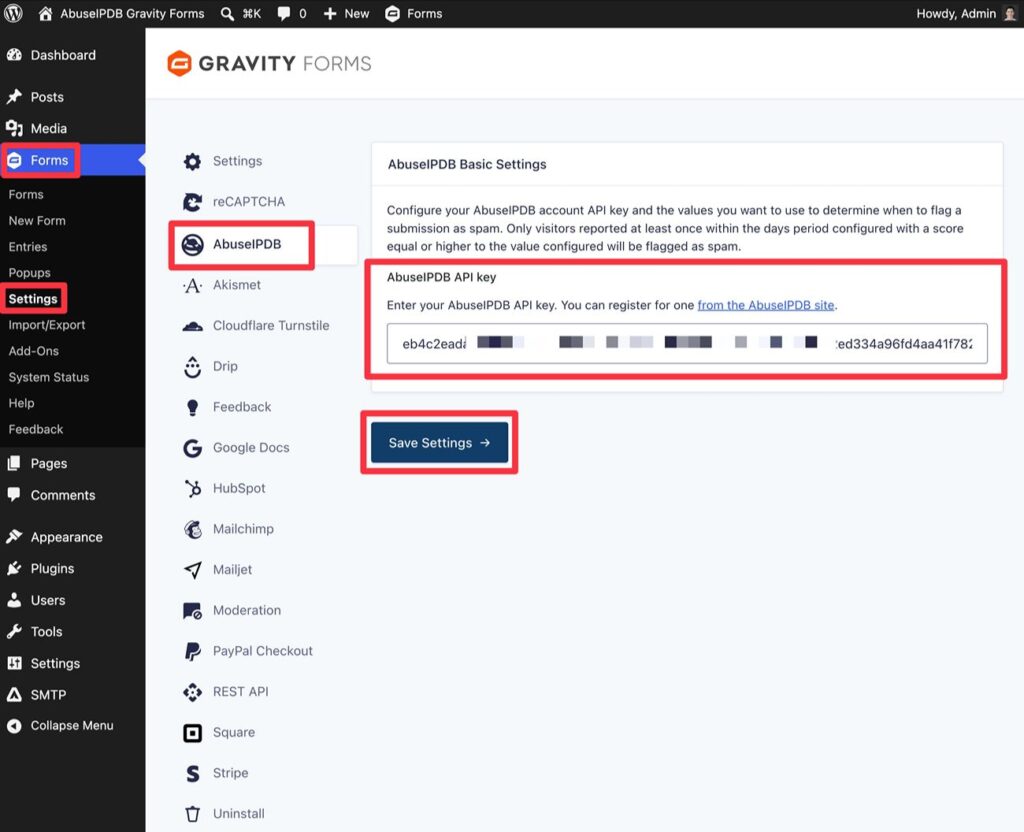
Once you add your API key and click Save Settings, you should see a green checkmark appear along with some additional settings to configure how the connection should work.
In the AbuseIPDB Basic Settings box, you can make two additional choices:
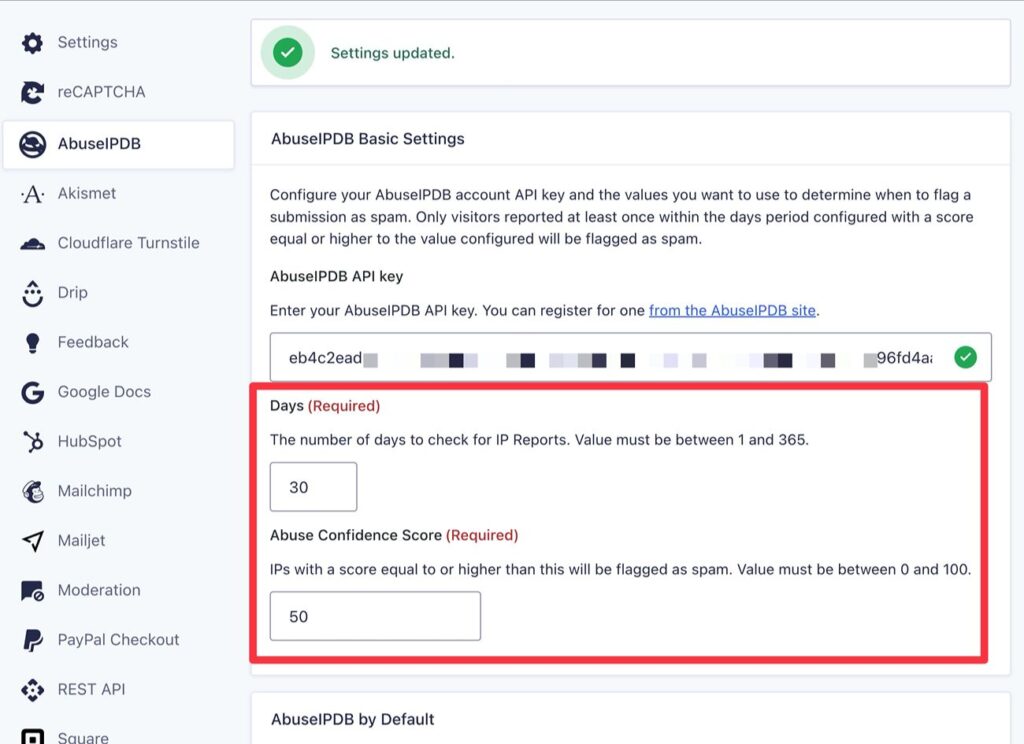
Below, you get three additional settings, all of which are optional. If you’re not sure about anything, you can just leave these settings as the defaults/empty.
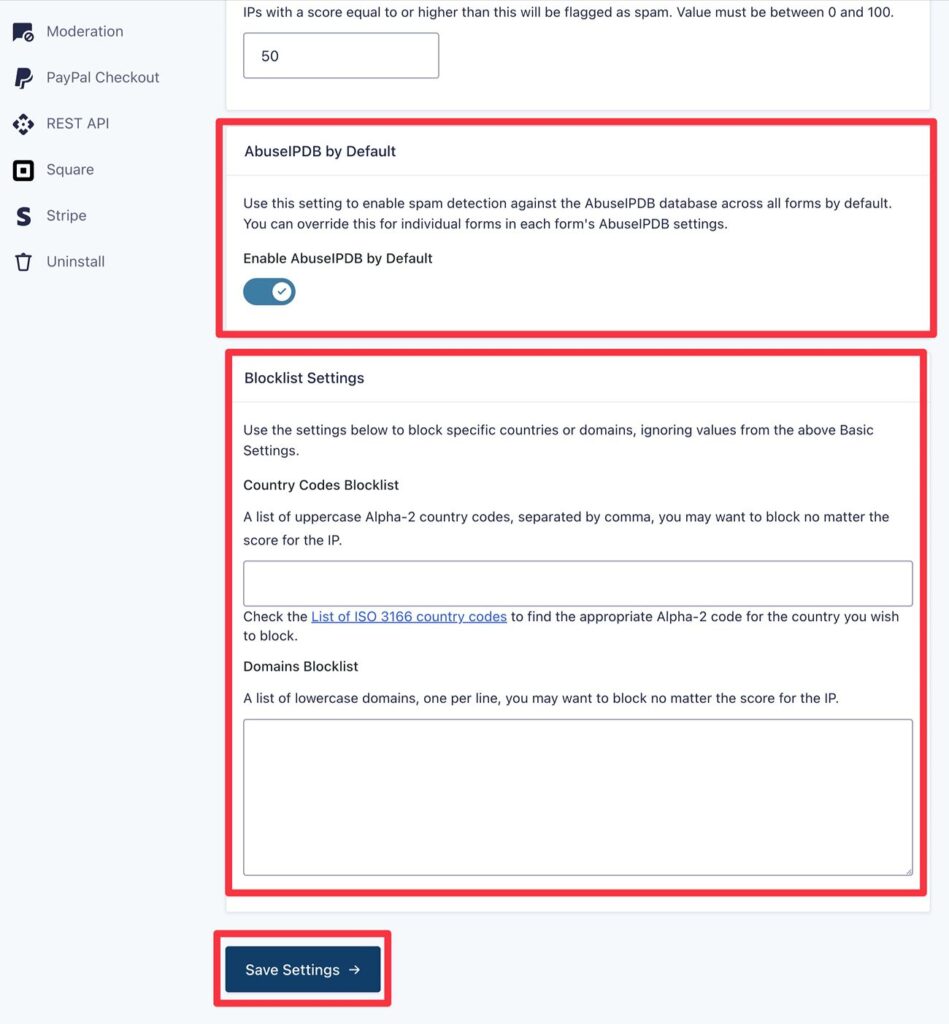
In the AbuseIPDB by Default box, you can choose whether to enable AbuseIPDB protection on all your forms by default.
Even if you enable it by default, you can still manually disable it on individual forms if needed. And vice versa – if you disable it by default, you can still manually enable it on individual forms if needed.
Below that, you can make two final choices in the Blocklist Settings box:
Once you’ve made all of your choices, make sure to click Save Settings at the bottom.
 5. Enable/disable AbuseIPDB for individual forms (optional)
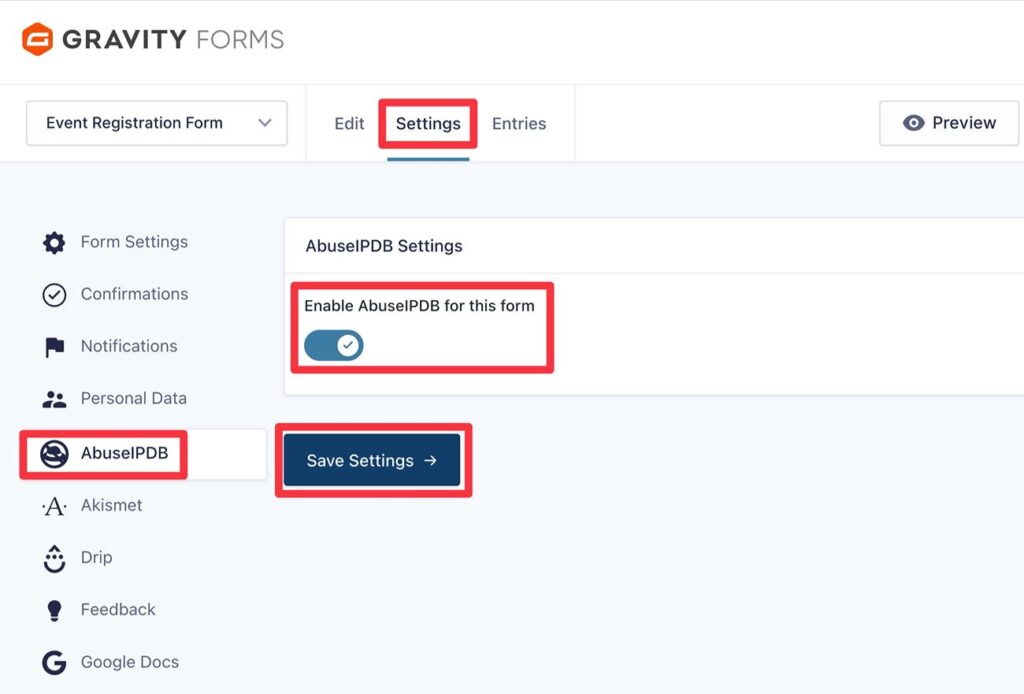
As we showed you above, you can choose whether to enable or disable AbuseIPDB protection as the default for all of the forms on your site.
Regardless of your choice in that setting, you still have the option to manually enable or disable AbuseIPDB protection for an individual form.
To do this, first open the editor for the form for which you want to adjust the AbuseIPDB behavior.
Then, go to Settings → AbuseIPDB inside the form editor. You can then use the toggle to enable or disable AbuseIPDB for that specific form.
Make sure to click Save Settings once you’ve made your choice.
 How to view AbuseIPDB details/spam entries
Once you’ve enabled AbuseIPDB for some/all of your forms, it will start protecting those forms automatically.
You have a few ways to view information from AbuseIPDB, as well as flagged entries.
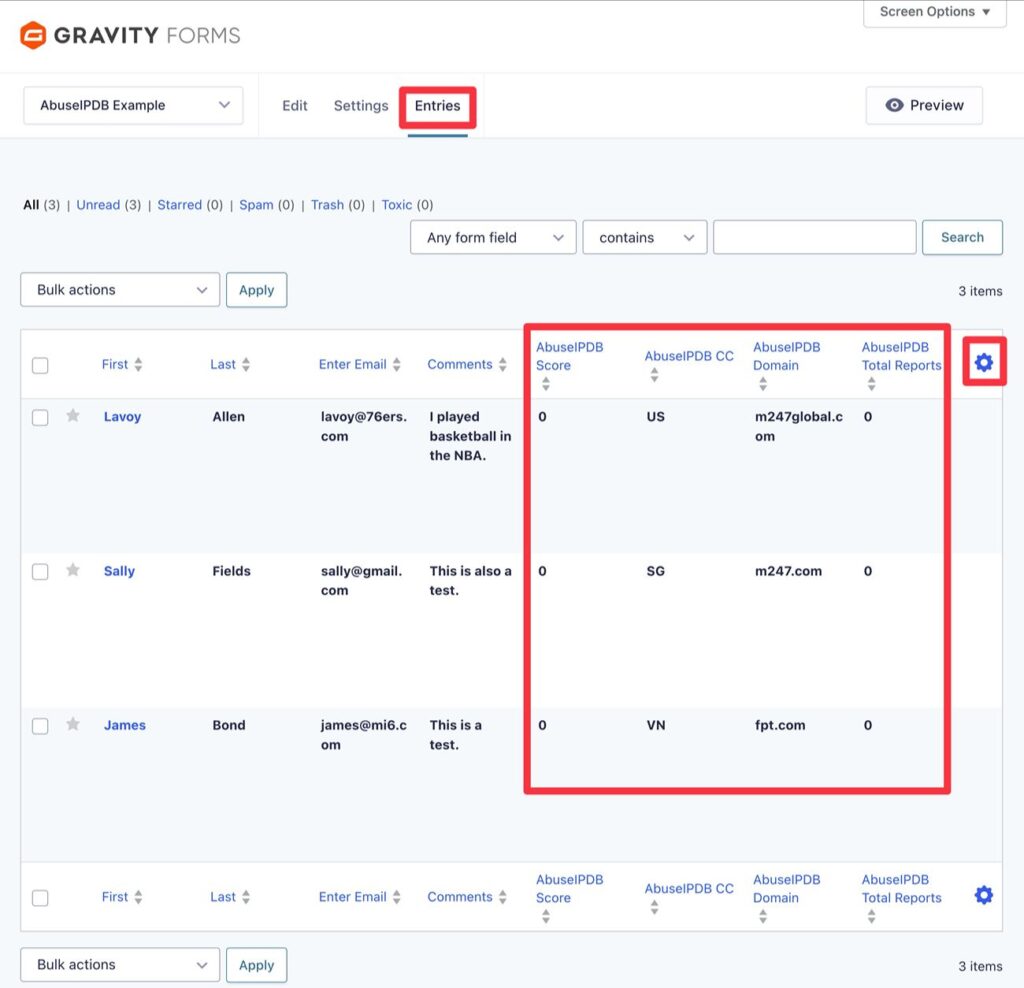
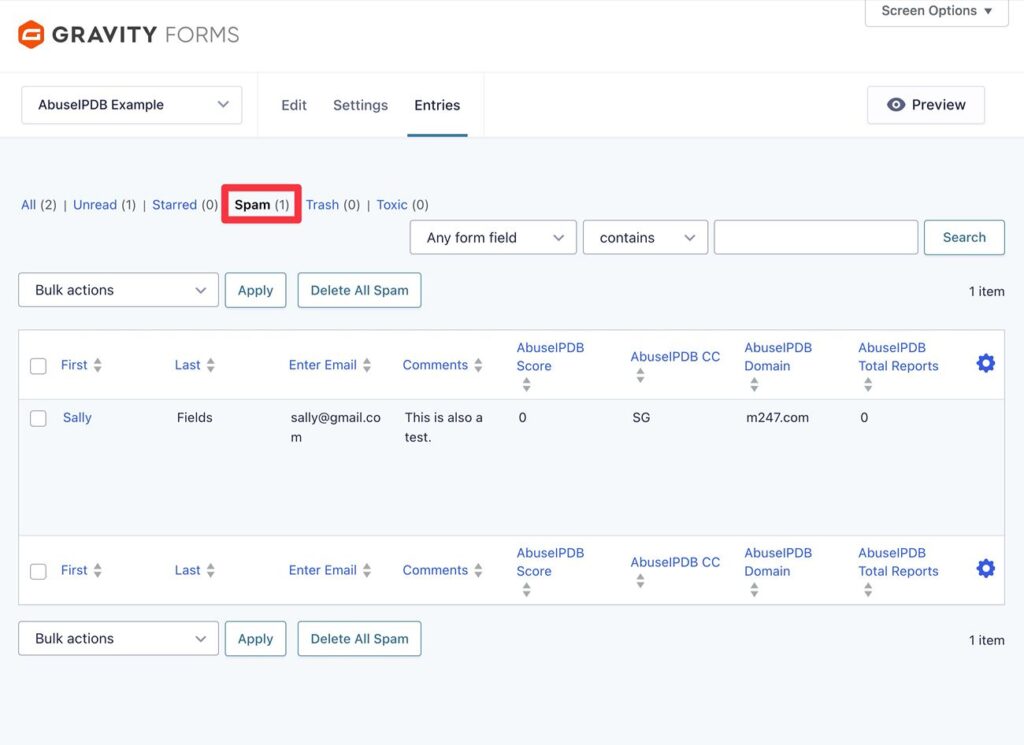
First, you can view four pieces of information in the form entries list:
If you don’t see this information by default, you can enable it by clicking the gear icon to adjust which columns to display in the list of entries.
Inside the entry details interface, you’ll also get a metabox that provides the AbuseIPDB details for that specific entry, along with the exact IP address.
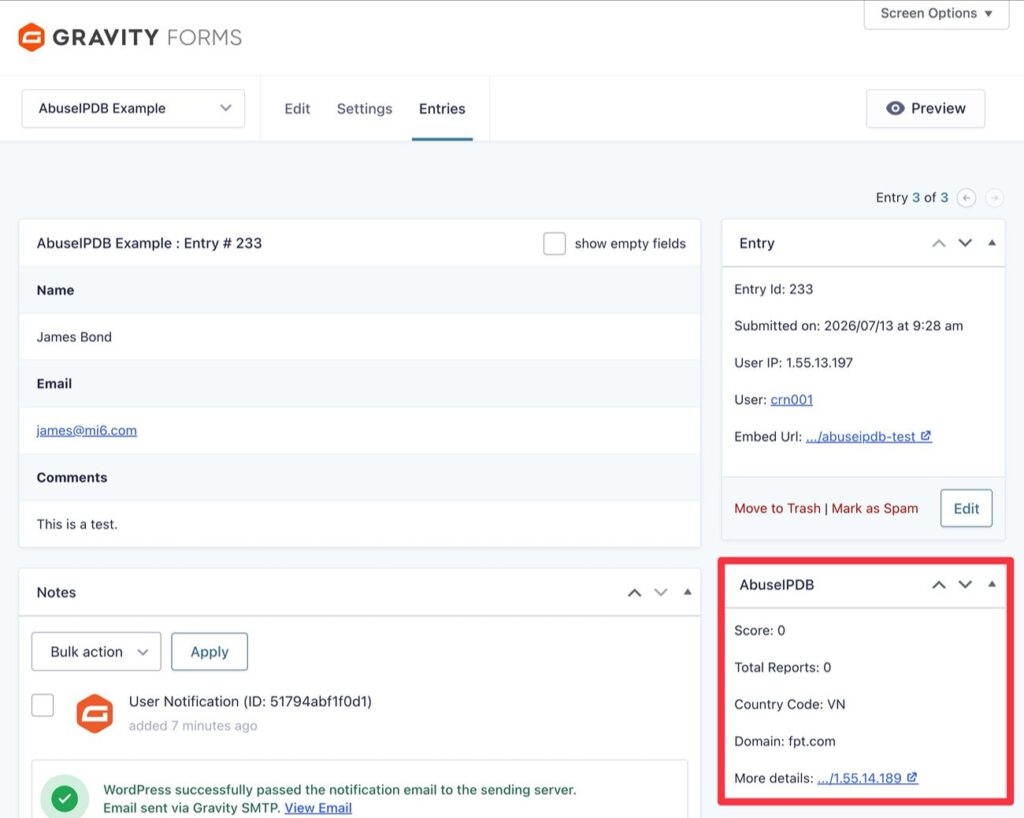
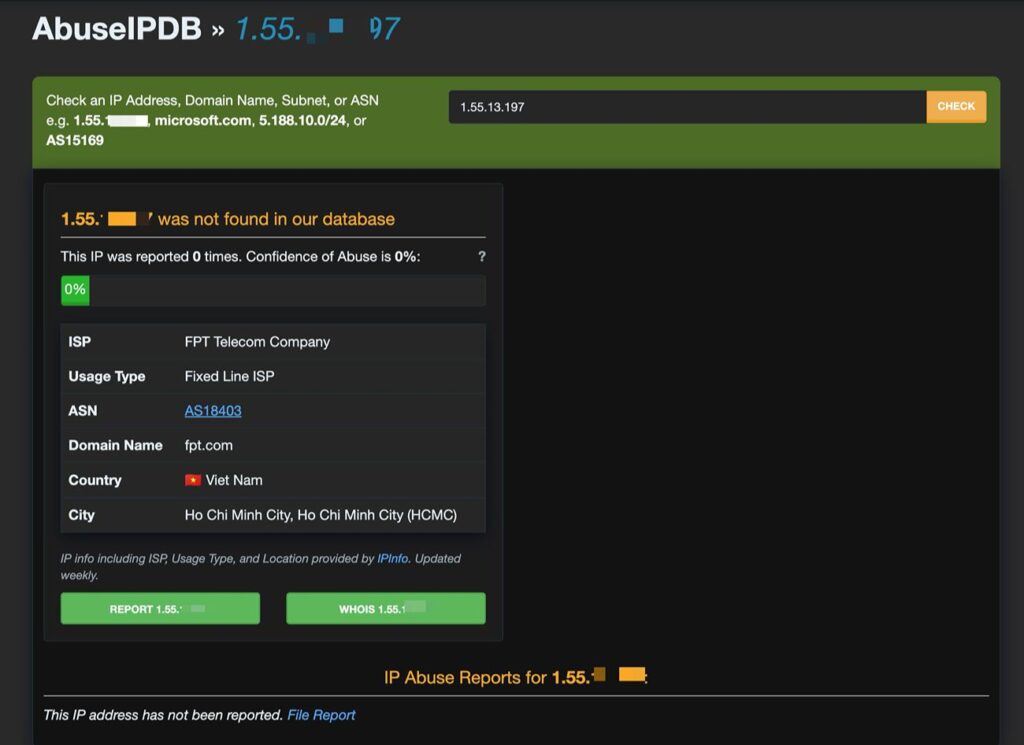
You can click the IP address’s link to open the full details page for that IP address on AbuseIPDB.
To find entries that AbuseIPDB has flagged as spam, you can go to the Spam tab in the entry list.
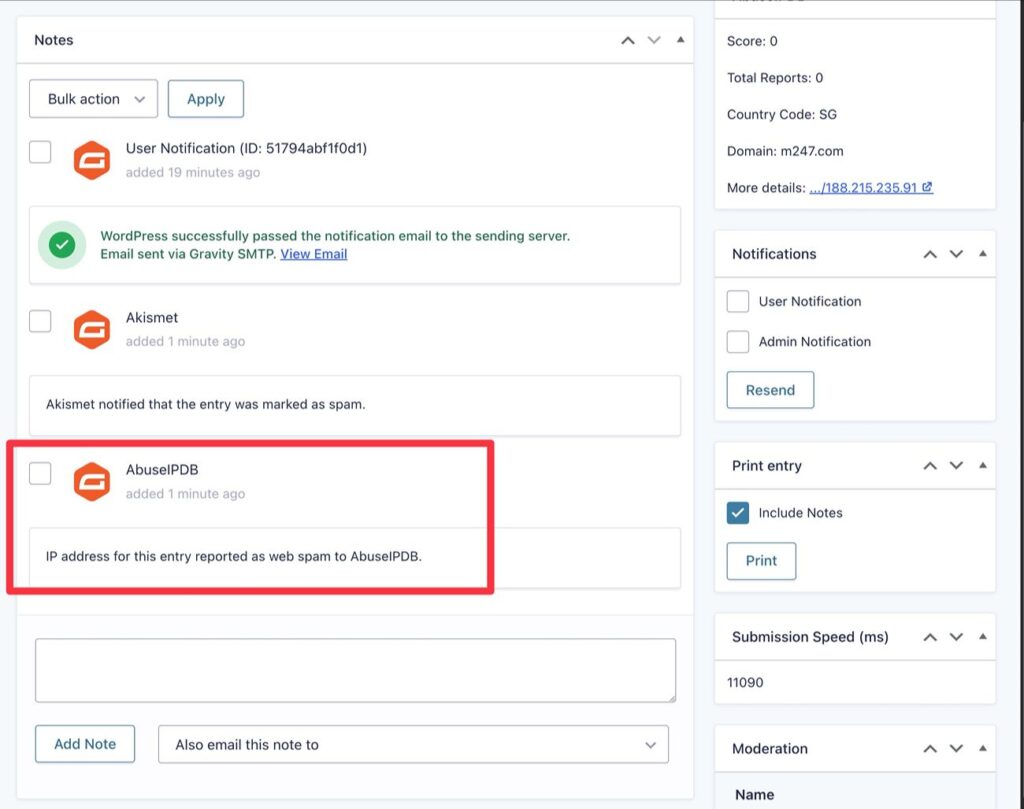
Whenever you manually flag an entry as spam, Gravity Forms will also report that IP address to AbuseIPDB. In that way, you’re both benefiting from and contributing to AbuseIPDB.
You can see this in the Notes section of the form entry details.
 Try the Gravity Forms AbuseIPDB Add-On today
With the Gravity Forms AbuseIPDB Add-On, you can access a new way to protect your WordPress forms from malicious actors, while also contributing to AbuseIPDB via the add-on’s two-way reporting functionality.
The add-on is available on all Gravity Forms licenses, so you can get started right away if you have an active license. If you don’t have an active license yet, you can purchase one here.
As we mentioned earlier, the AbuseIPDB Add-On is just one of the many options that Gravity Forms gives you to protect your forms from spammers and other malicious actors.
You can also access other integrations and core features such as Cloudflare Turnstile, Google’s reCAPTCHA, Akismet, honeypots, submission speed checks, and more.
If you want to learn more about all your options, check out our ultimate guide to WordPress form spam protection.
 Newsletter
If you want to keep up-to-date with what’s happening on the blog sign up for the Gravity Forms newsletter!
"*" indicates required fields
| # | Наименование новости | Тональность | Информативность | Дата публикации |
|---|---|---|---|---|
| 1 | Gravity Forms Versioning: Bring version control to your forms | 0 | 7.14 | 03-09-2026 |
| 2 | Google Docs + WordPress: How to get started with the Gravity Forms Google Docs integration | 0 | 5.08 | 20-08-2026 |
| 3 | Drip for WordPress: How to get started with the Gravity Forms Drip Add-On | 0 | 7.45 | 23-07-2026 |
| 4 | WordPress popups: Get started with the Gravity Forms Popup Add-On | 0 | 9.31 | 30-07-2026 |
| 5 | Mailjet for WordPress: How to get started with the Gravity Forms Mailjet Add-On | 0 | 7.45 | 16-07-2026 |
| 6 | 5 steps to build a successful referral program with Gravity Forms and Siren | 0 | 7.41 | 17-08-2026 |
| 7 | How to set up Cloudflare Email Service for transactional emails on WordPress | 0 | 4.86 | 11-09-2026 |
| 8 | Cybersecurity for WordPress: Protecting Websites from Next-Gen Threats #wordpress #internet #cybersecurity | 0 | 14.4 | 15-06-2026 |
| 9 | Best plugin to secure WordPress pages | 0 | 8.26 | 14-07-2026 |
| 10 | Антиспам для WordPress, часть 2: что успело поменяться | 0 | 9.59 | 12-08-2026 |