Просмотр новости
Найдите то, что Вас интересует
 Спутники
 РН
РН SpaceX
 Роскосмос
 NASA
NASA
СпутникиРНSpaceXРоскосмосNASA
If every picture you take looks boring and overprocessed, you can change your iPhone camera settings to take natural, lo-fi pictures.
(via Cult of Mac - Your source for the latest Apple news, rumors, analysis, reviews, how-tos and deals.)
If you feel like every photo you take looks boring and overprocessed, you can change your iPhone camera settings to take natural, lo-fi pictures.
Turning down the exposure can prevent the photo from looking unnaturally bright (and more like something shot on an older digital camera). If you have a newer iPhone, you can even change its Photographic Style to “Natural,” for better-looking colors. A few quick trips into the Settings app can turn off the lens distortion on the Ultra Wide and selfie cameras, for that pure fisheye look.
You can even take things a step further and download a different camera app — one that captures totally unprocessed photos straight from your iPhone’s sensor.
Here are my top tips for taking lo-fi iPhone photos.
5 tips to help you take natural, lo-fi pictures with your iPhoneThe iPhone’s “computational photography mad science” can turn murky-looking shots into unnaturally gorgeous shots. However, some people are pushing back against the extensive post-processing that your iPhone does on every picture.
Apple once proudly stated that the iPhone can process “4 trillion operations per photo.” Meanwhile, Gen Z is gravitating toward basic digital cameras with zero operations per photo.
But hold up before you go full Sony Mavica. You don’t actually need a separate camera to take lo-fi pictures. You can get a natural look by changing some settings on your iPhone, with the convenience of having pictures instantly appear in your Photos library.
Table of contents: Take lo-fi pictures on iPhone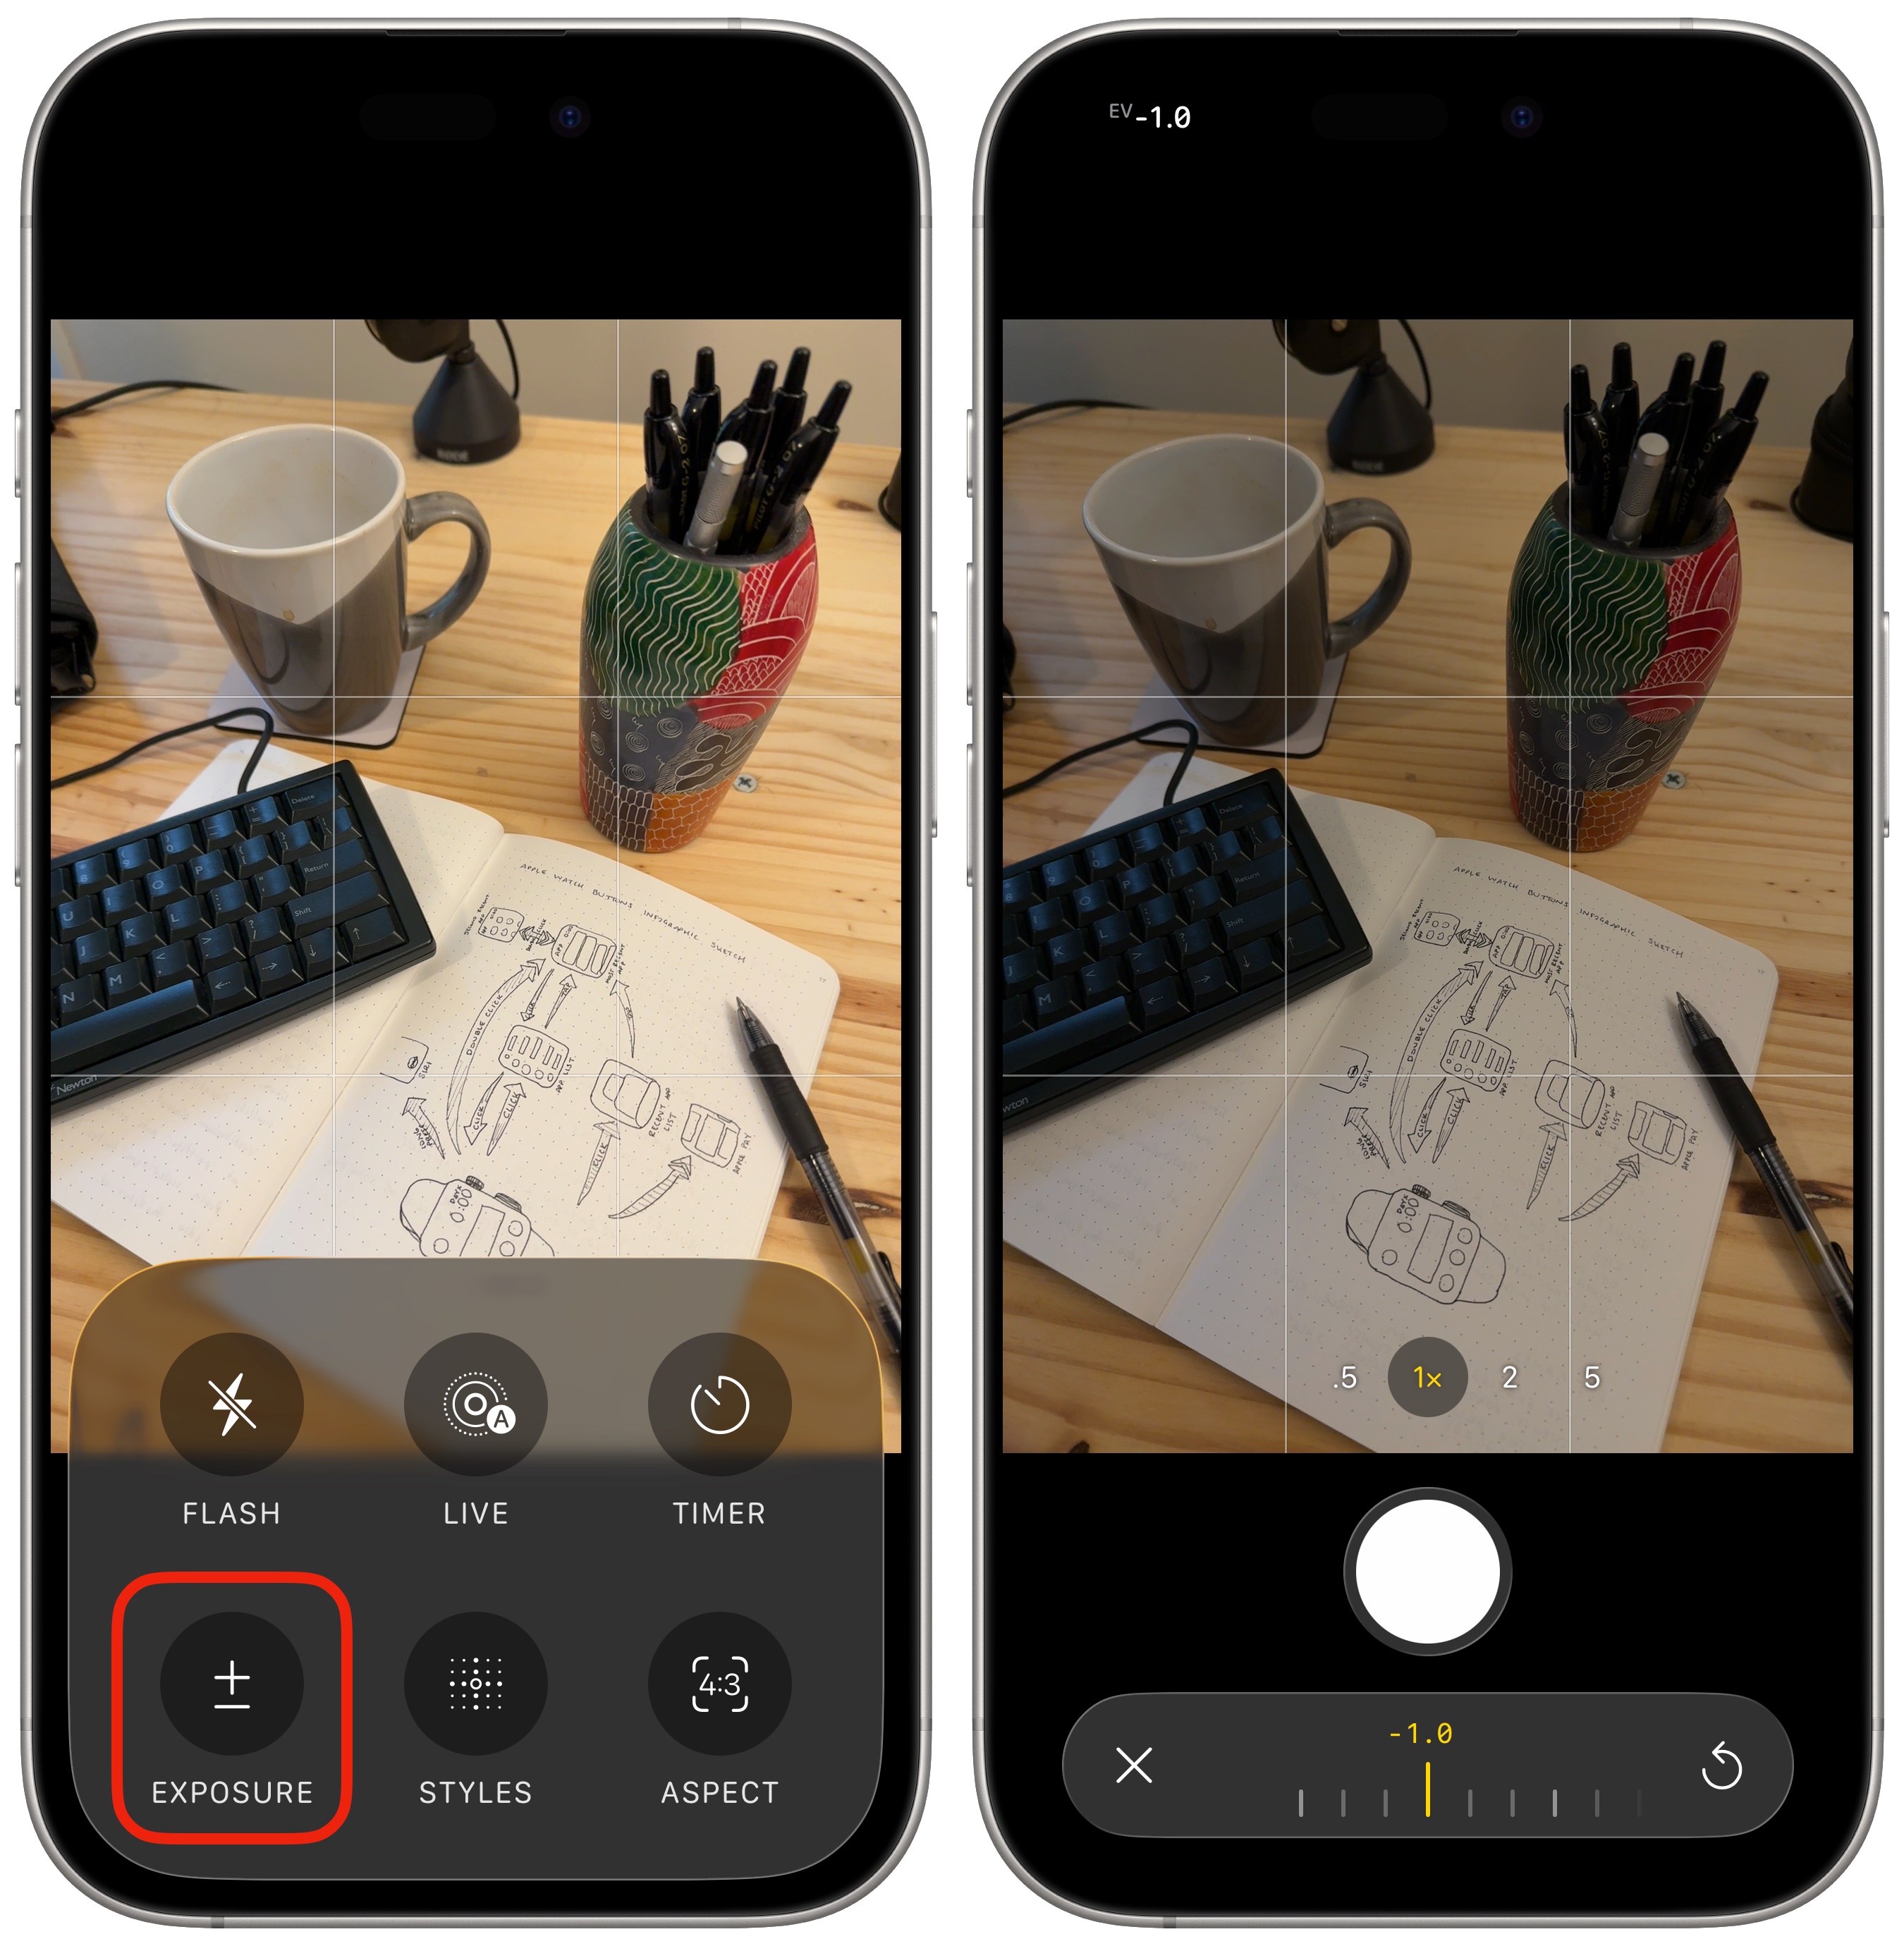 Turn down the exposure, like an old digital camera with a small sensor.
iPhones are notorious for overexposing pictures to make them really bright and vivid. Apple never wants a shot to be wasted because it’s too dark, in any lighting condition — but that can make some scenes unnaturally bright.
To tone that down, tap the Photo button at the bottom of the screen to bring up the menu, then tap Exposure. That’ll bring up a slider at the bottom of the screen. Swipe right just a little bit, around –0.7 or –1.0. After that, you should see deeper, richer colors in your shots.
To make sure this setting stays the same every time, go to Settings > Camera > Preserve Settings, then enable Exposure Adjustment.
Turn off lens correction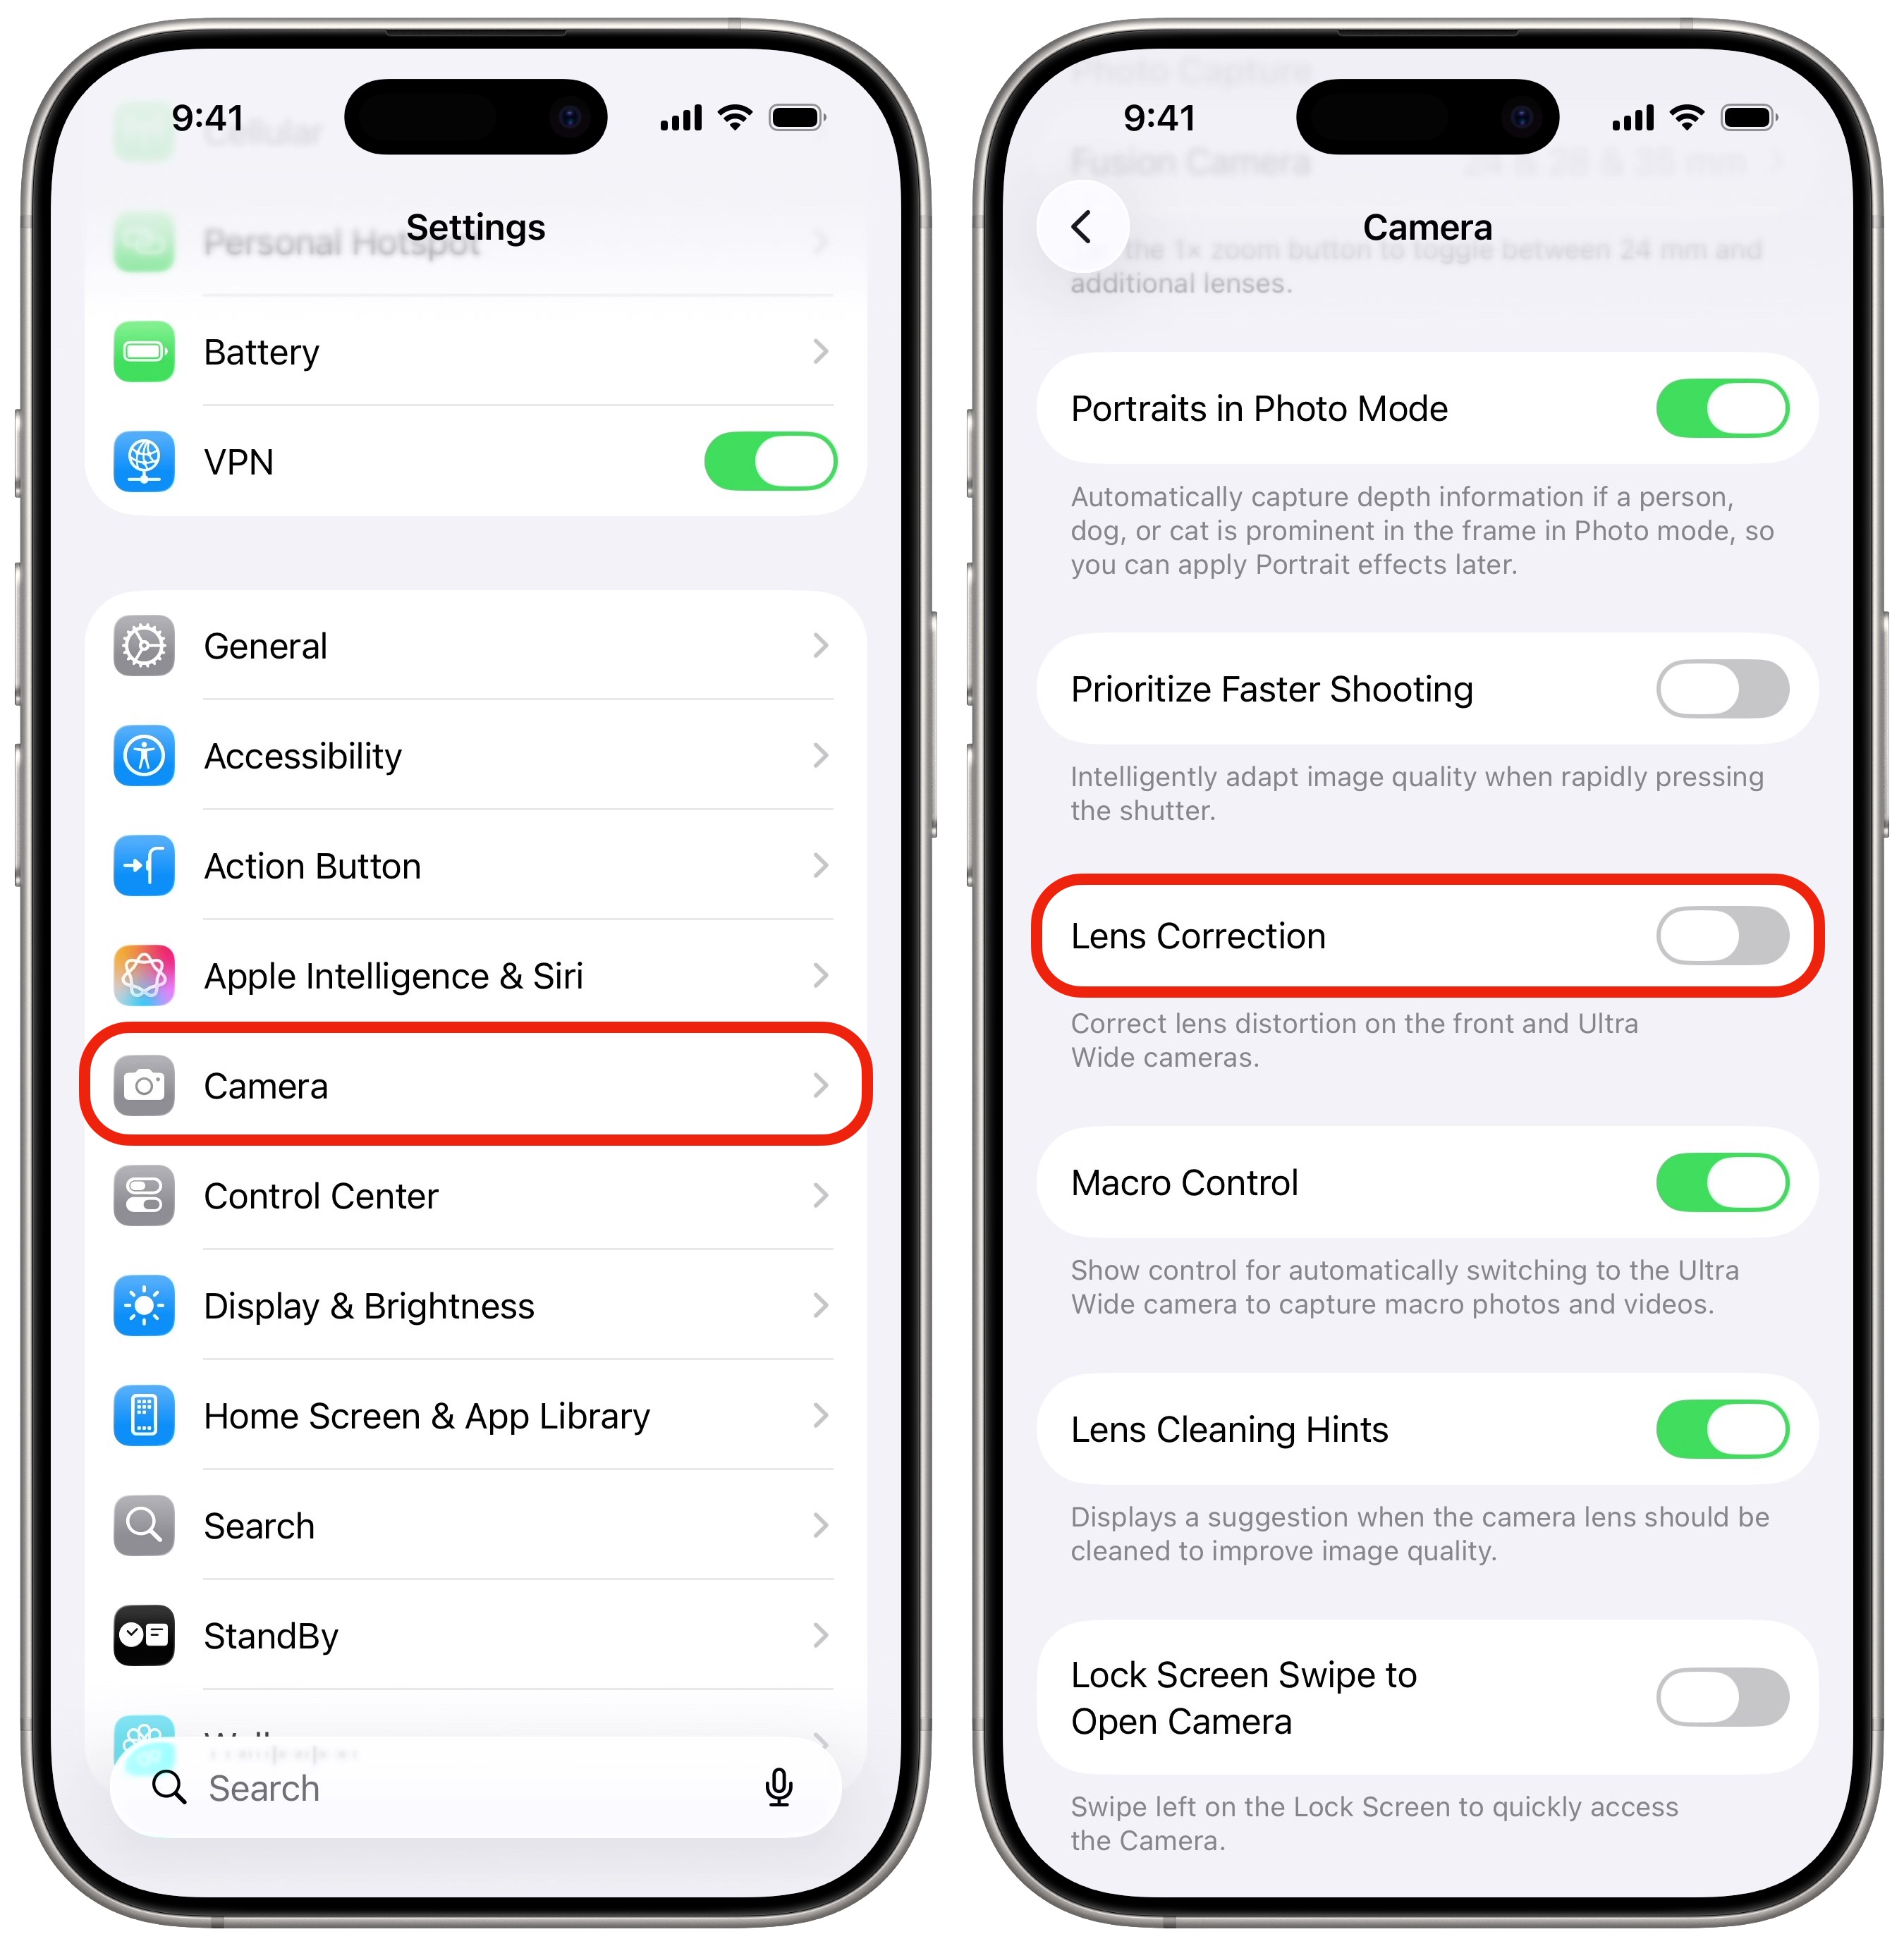 Make your Ultra Wide pictures look as intended.
The selfie camera and the Ultra Wide lens have a dramatic fisheye effect due to their big field of view. Well, they would, except the default setting is to warp the image back to a more rectangular shape with a straighter perspective around the corners.
However, you can easily switch off a single setting to get a natural wide-angle shot. Go to Settings > Camera and turn off Lens Correction.
Use the Natural Photographic Style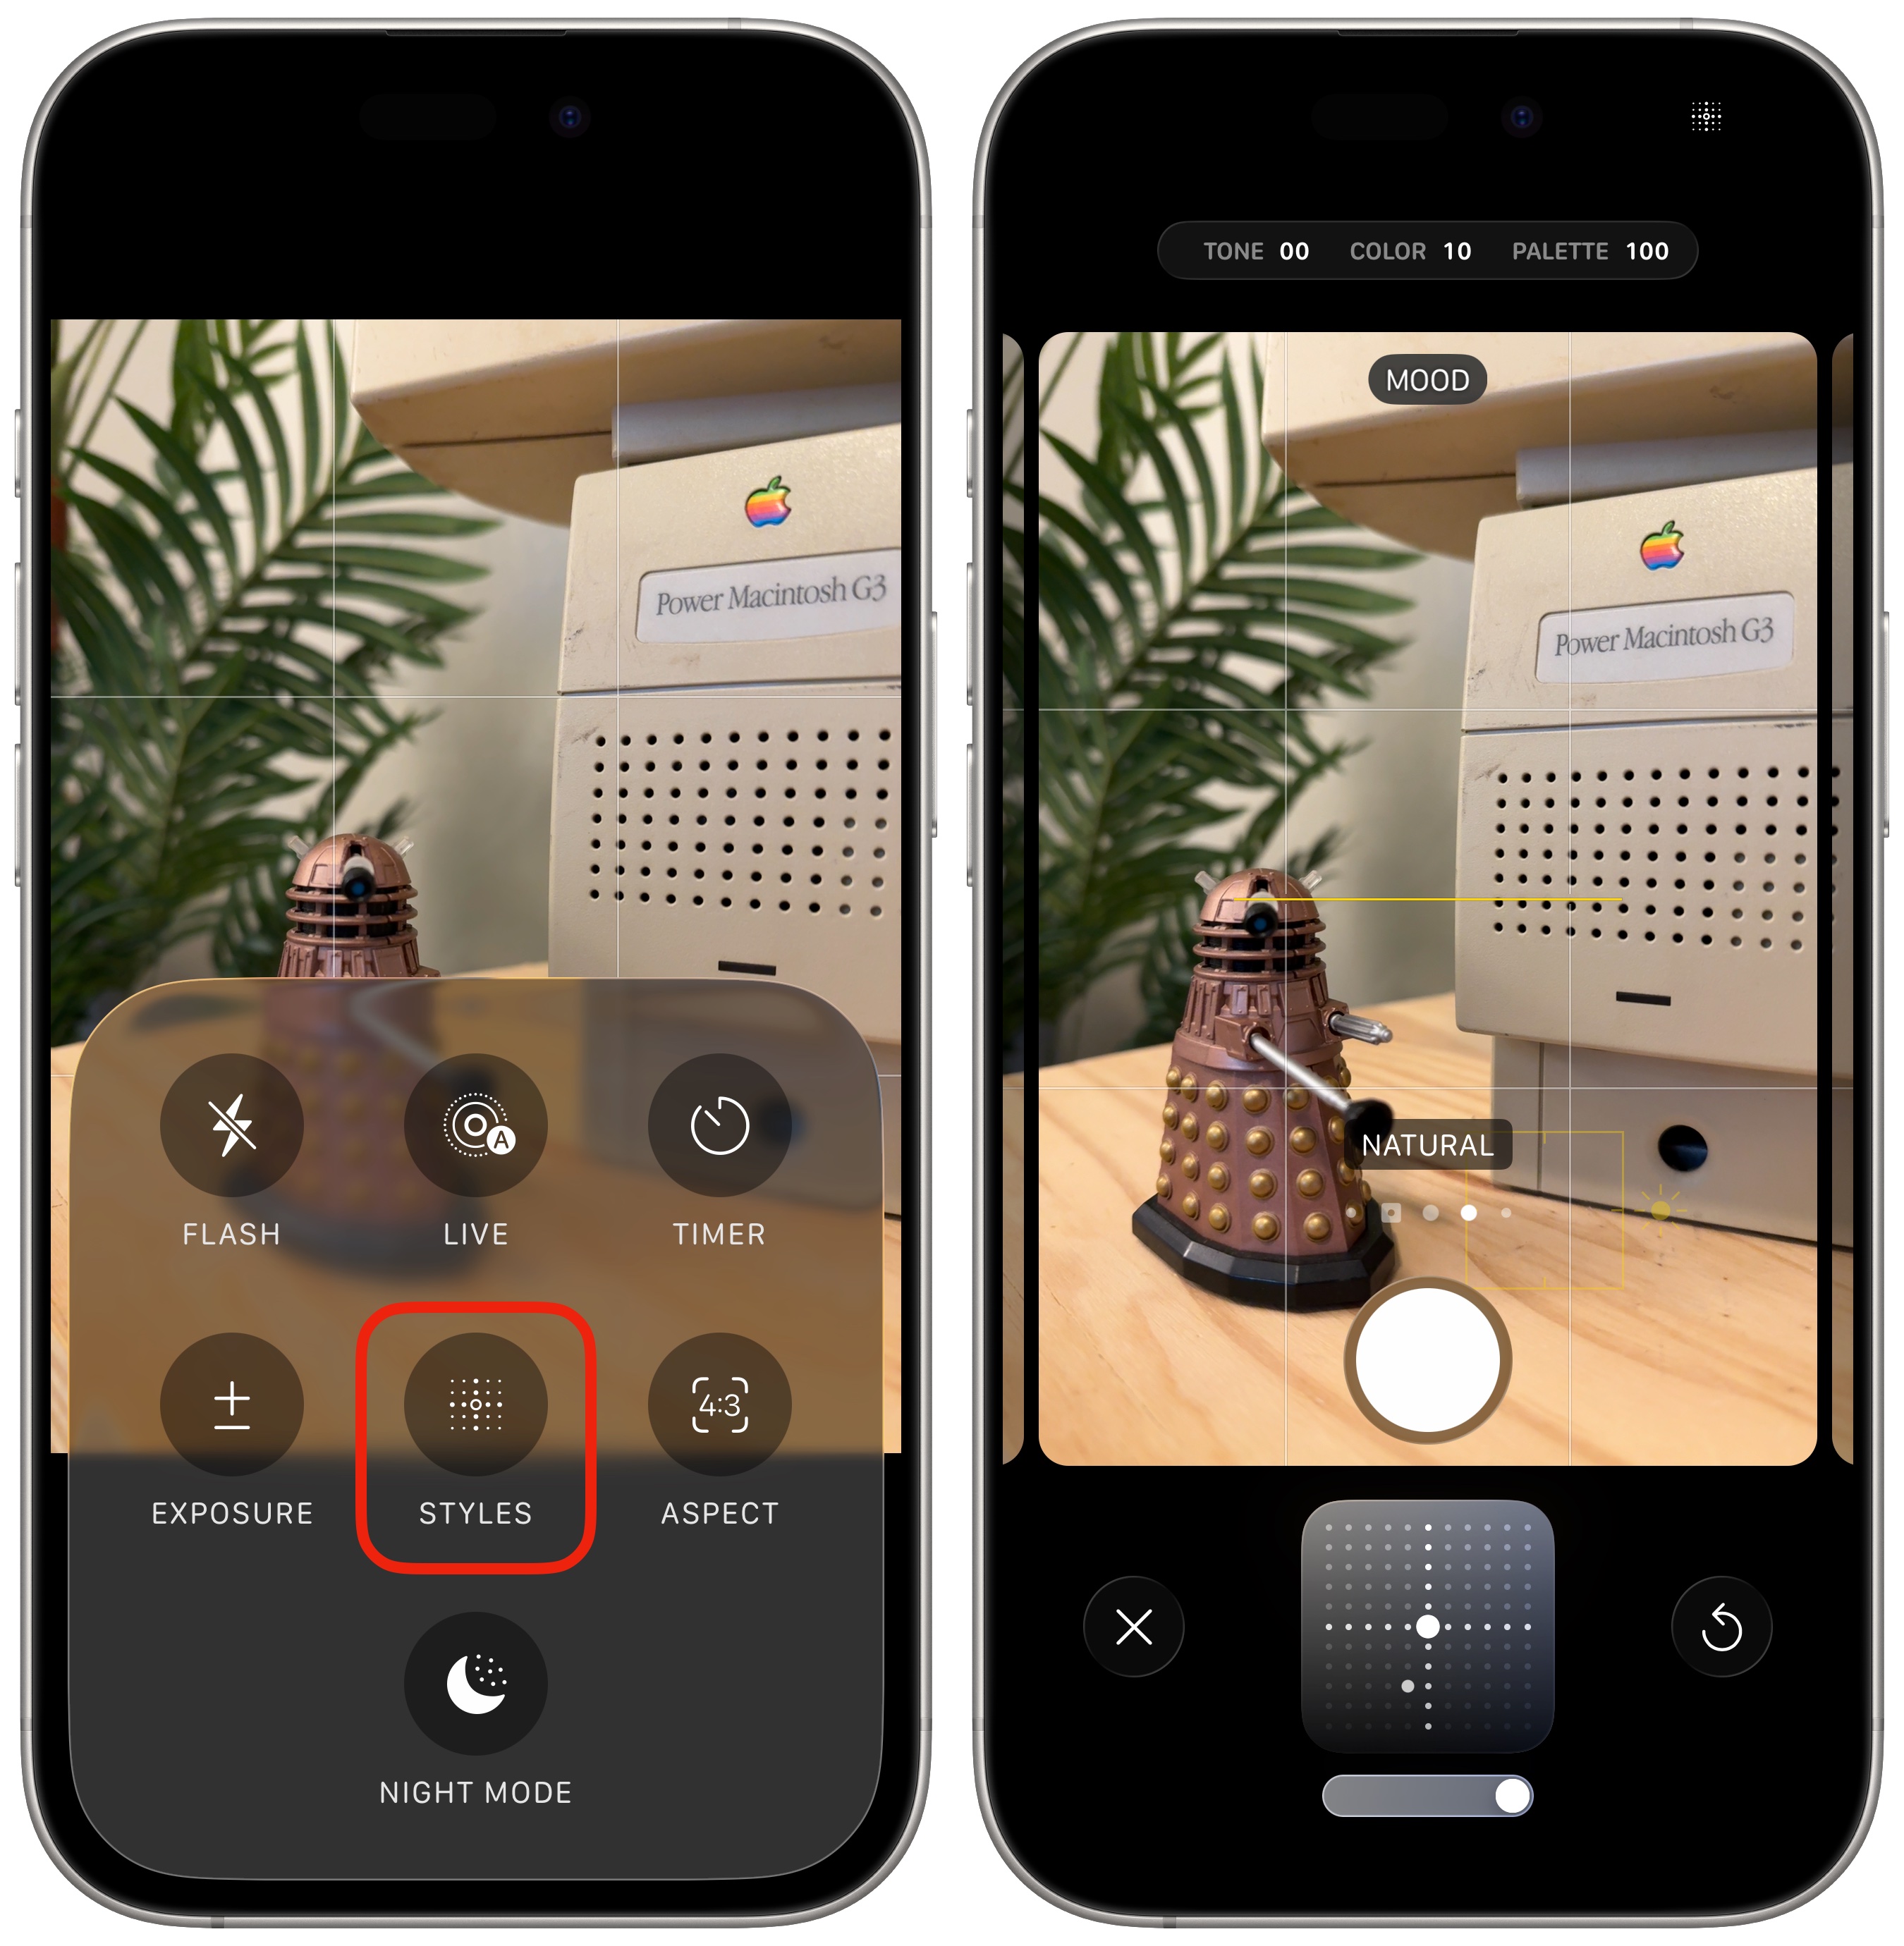 Make your pictures utilize a more natural color palette.
If you have an iPhone 16 or 17 (except the 16e and 17e), you can take advantage of iOS’ Photographic Styles to capture lo-fi pictures. Your iPhone stores a bunch of extra sensor data alongside each picture, so you can go back later and change how it processes colors. It’s much more advanced than using a filter.
One of the Photographic Styles is called Natural — perfect for capturing a scene exactly how it appears. To try it out, from the Camera app, tap Photo at the bottom of the screen to bring up the settings menu. Tap Styles to choose a style, then swipe left twice to go from Standard, to Vibrant, then to Natural.
To make sure your iPhone preserves this setting every time you open the Camera app, go to Settings > Camera > Preserve Settings, and make sure Photographic Style is enabled.
Mirror the front camera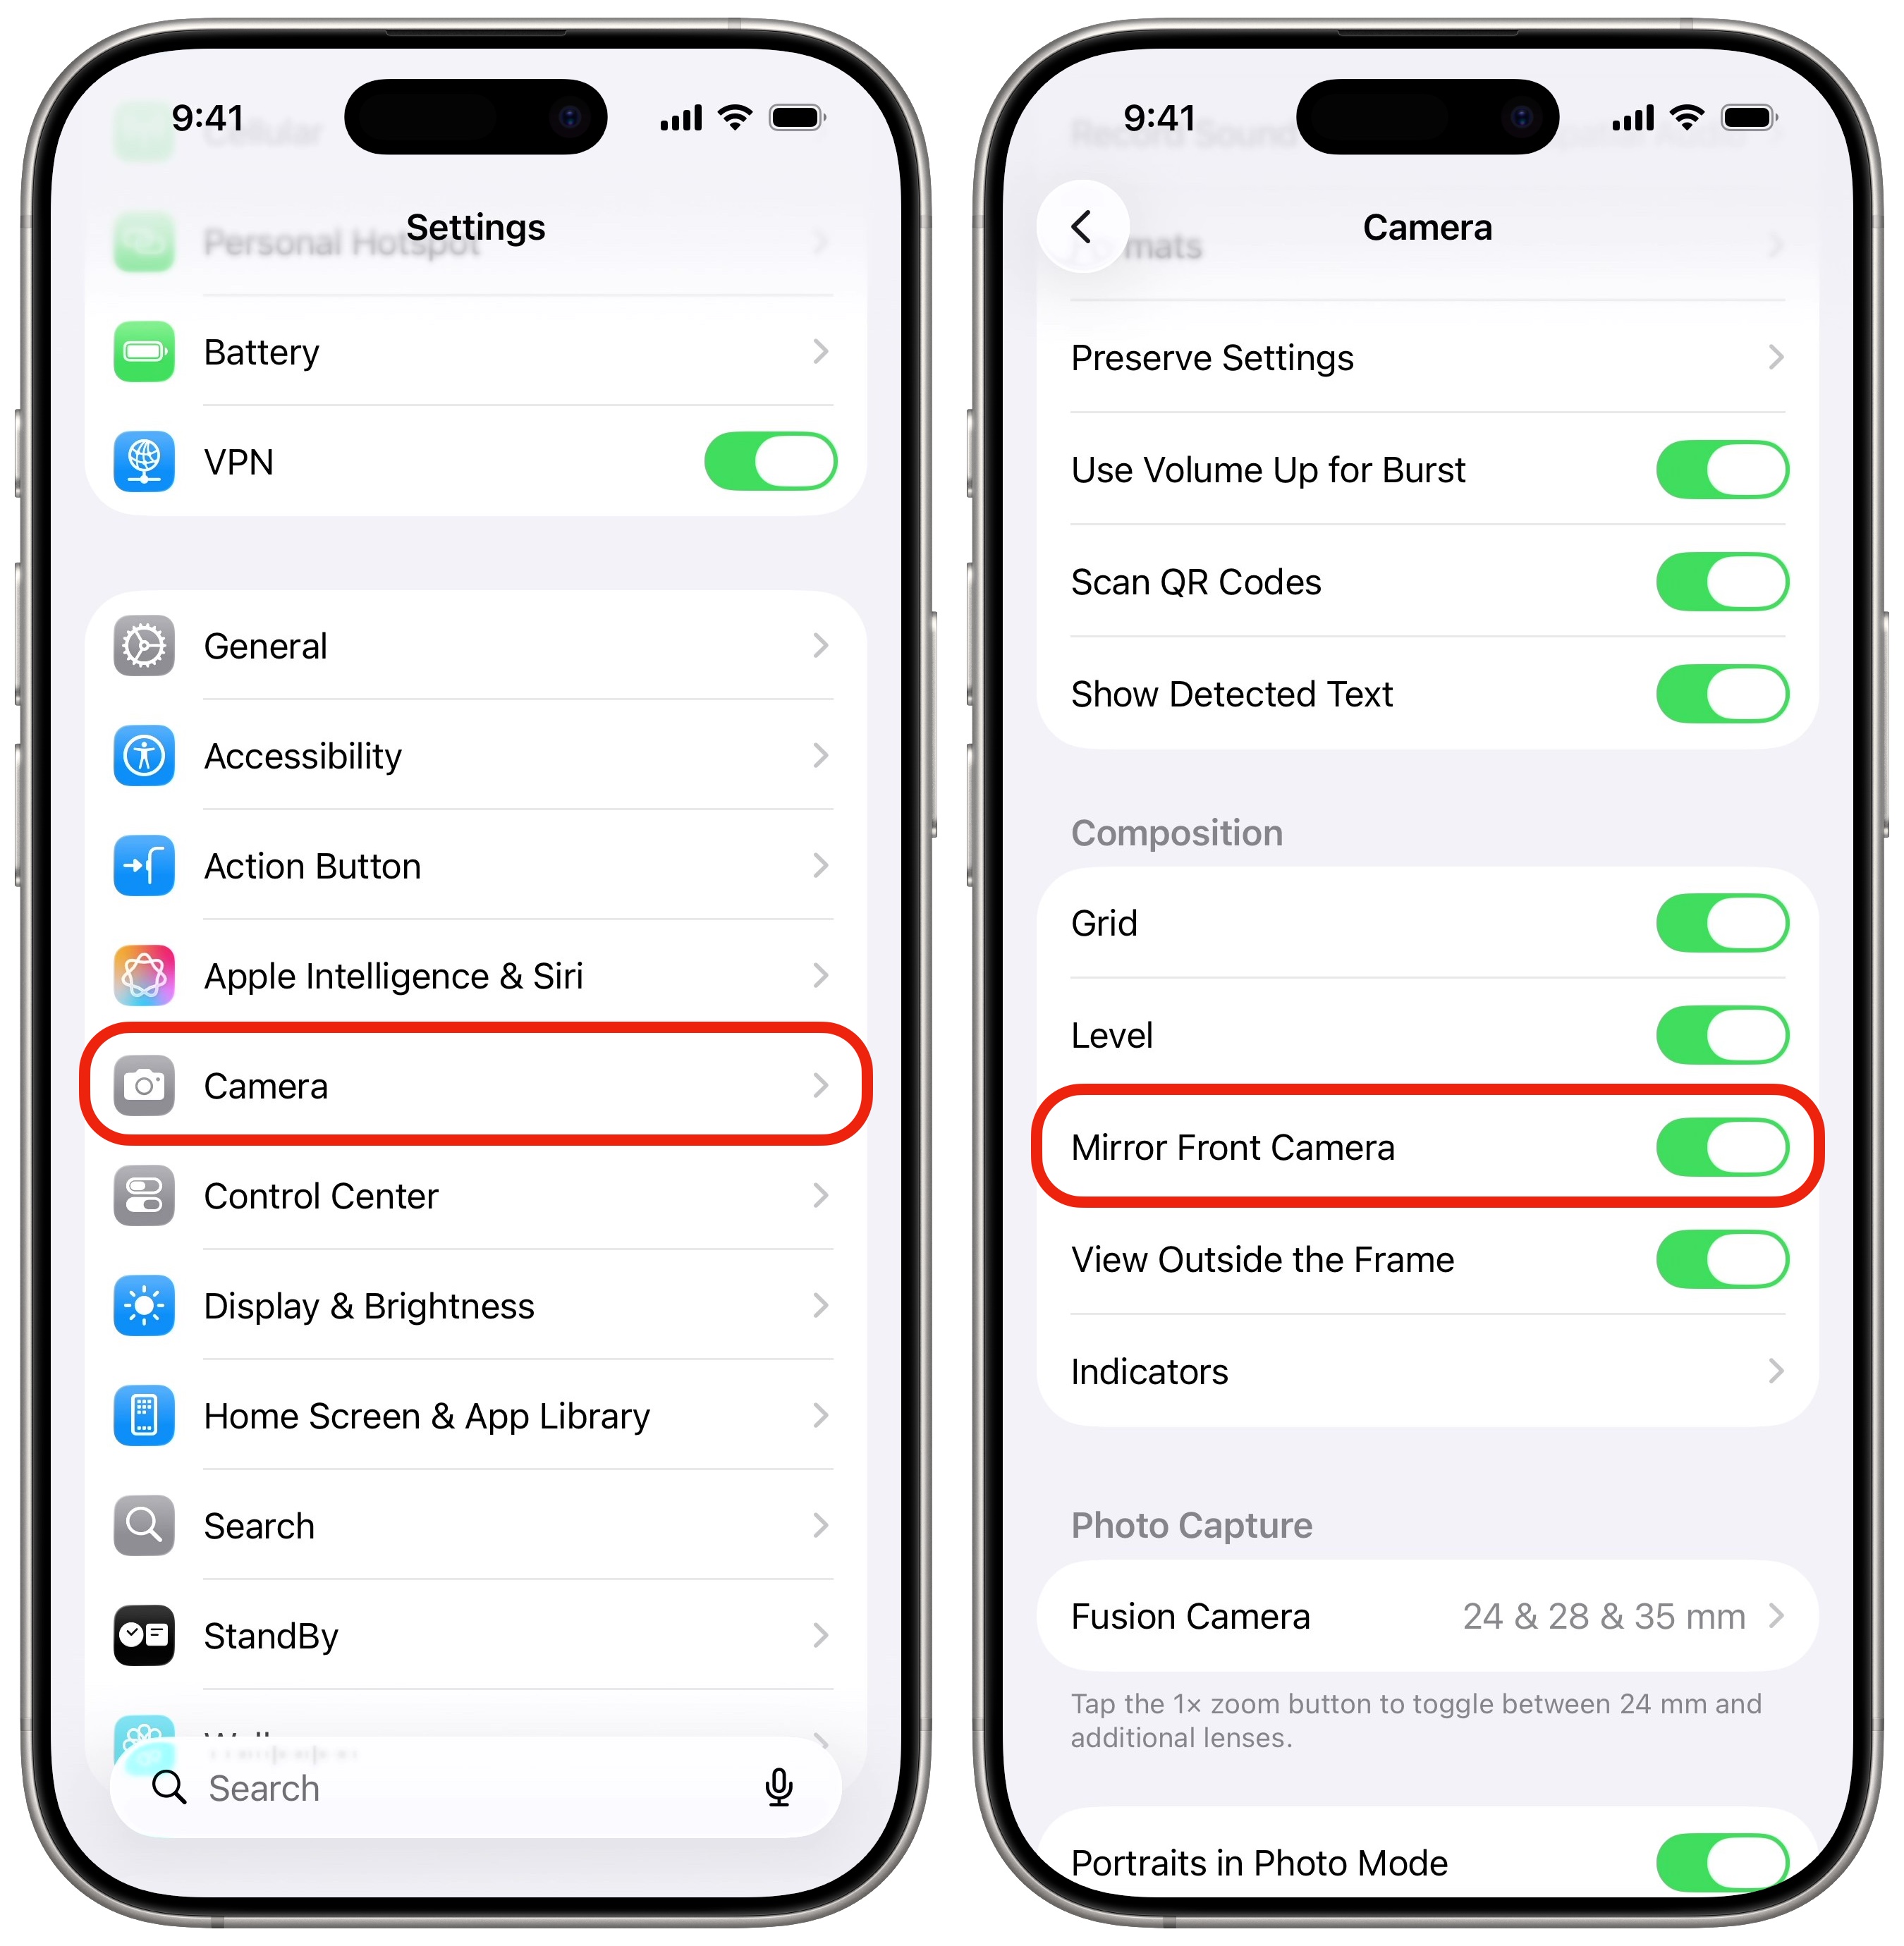 This setting will make your selfies look more natural.
If you feel like your selfies always look slightly odd, you’re not alone. No matter how symmetrical your face may be, the most minuscule differences can make a flipped photo of yourself look weird.
You can change this setting so that your selfies are flipped, like a mirror. Go to Settings > Camera and enable Mirror Front Camera.
You can go back and apply this to selfies you’ve previously taken, too. In Photos, go to the Collections tab, scroll down to the Media Types section, and tap Selfies. Tap on a selfie and tap the Edit button (the icon in the center-right), then tap Crop. The Flip button in the top left will flip the photo horizontally. Tap Done.
Now, you can copy and paste this edit across all your selfies. Tap the More button in the upper right and tap Copy Edits. Select Rotation, uncheck everything else, and tap Done. Then go back to your grid of selfies, tap Select, and drag your finger across the grid to select a bunch at once. Tap More, then tap Paste Edits.
Take lo-fi pictures using a special iPhone camera app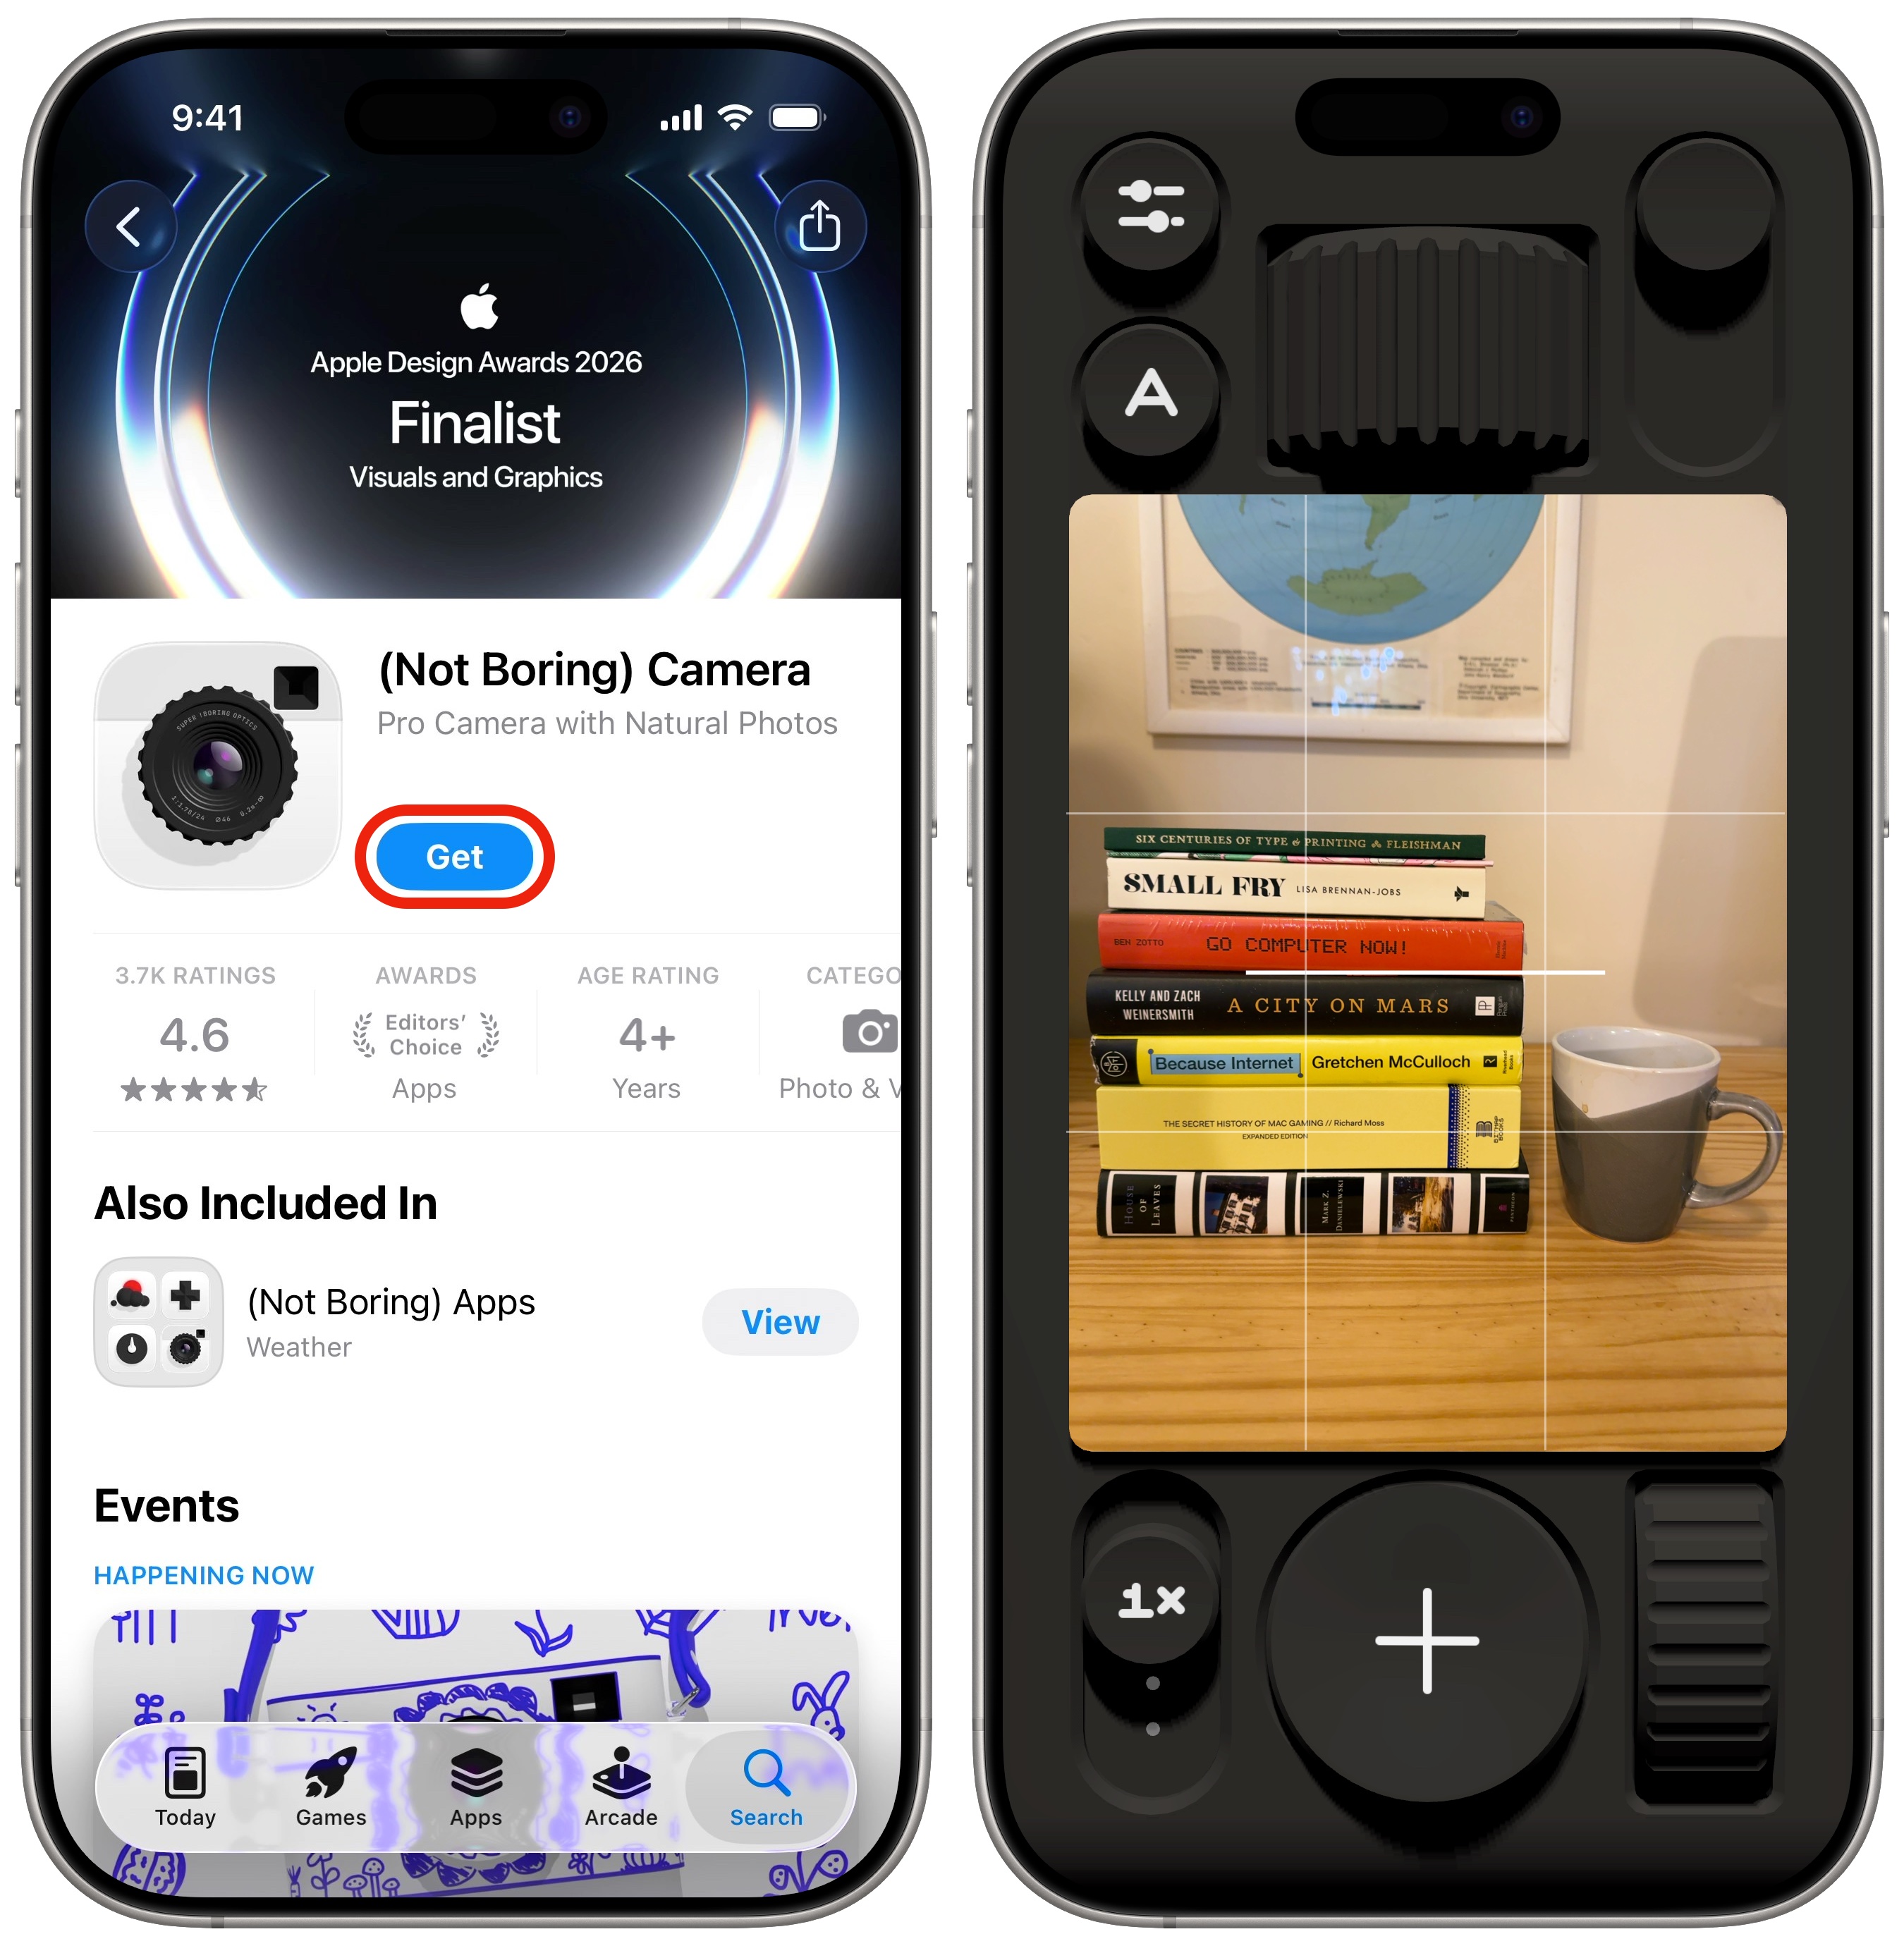 Try out (Not Boring) Camera to take lo-fi pictures.
Ultimately, there’s only so much you can do with Apple’s built-in Camera app if you want to take lo-fi pictures. It utilizes an image pipeline that performs some level of processing on every shot.
If you want truly unprocessed photos straight from your iPhone’s sensor, you can turn to a third-party camera app. My favorite is called (Not Boring) Camera.
With the basic free version, you can use the app’s quirky haptic controls to take unprocessed photos straight from the camera sensor. They’re not HDR. Bright parts of the image may be blown out; dark parts of the image may be grainy. You’ll get that point-and-shoot camera feeling, but with the convenience of using your iPhone.
Unlike RAW-formatted pictures, these photos don’t take up any more space than a regular picture (around 2MB, while a RAW photo might be several times larger).
In the paid version of the app, you unlock extra features like different photo styles, different interface colors, customizable controls, manual camera settings, HDR and RAW camera formats.
Buy from: App Store
Price: Free with basic features; $7.99 monthly, $14.99 yearly or $59.99 lifetime purchase
Now that you’ve mastered taking lo-fi pictures on your iPhone, dive deeper into the iPhone’s Camera app with these how-tos:
| # | Наименование новости | Тональность | Информативность | Дата публикации |
|---|---|---|---|---|
| 1 | 8 built-in editing tools to glow up your pictures on your iPhone | 0 | 24.6 | 30-05-2026 |
| 2 | My top 3 tips for making an iPhone Home Screen that doesn’t suck | 0 | 22.53 | 09-05-2026 |
| 3 | How to remove an object from a photo with Apple Intelligence | 0 | 20.8 | 28-04-2026 |
| 4 | How you can stop the endless madness of iPhone notifications | 0 | 26.24 | 14-05-2026 |
| 5 | 5 ways the Camera in iOS 27 is more refined than ever | 5 | 5 | 03-07-2026 |
| 6 | How to take fabulous fireworks photos with your iPhone | 5 | 5 | 03-07-2026 |
| 7 | Tons of new features in Photos help sort your massive library in iOS 27 | 6 | 6 | 30-06-2026 |
| 8 | Fed up with iPhone autocorrect? Here’s how to reset it. | 0 | 20 | 10-05-2026 |
| 9 | 6 ways to personalize your Mac and make it your own | 0 | 20.8 | 28-05-2026 |
| 10 | iOS 27 feature could prove an iPhone photo isn’t AI slop | 0 | 24.98 | 11-08-2026 |