Просмотр новости
Найдите то, что Вас интересует
 Спутники
 РН
 SpaceX
 Роскосмос
 NASA
СпутникиРНSpaceXРоскосмосNASAA technical guide to how self-driving cars actually work. CAN bus protocols, neural networks, sensor fusion, and control system with open source implementations, most of which can be accessed through Python.
Most explanations of self-driving cars wave their hands at "AI" and "sensors." This isn't that. This is a walk through the actual software stack—from raw sensor data to wheel actuation—with code from real open source implementations.
We'll examine two primary open source stacks: comma.ai's openpilot (end-to-end neural network approach) and Autoware (modular ROS2-based stack). These represent the two dominant architectural philosophies in autonomous driving.
Every autonomous vehicle starts with sensors. The choice of sensors defines the capabilities and constraints of the entire system.
| Sensor | Data Rate | Resolution | Range | Use Case |
|---|---|---|---|---|
| Camera | 20-60 Hz | 1-8 MP | ~200m | Lane detection, sign recognition, object classification |
| LiDAR | 10-20 Hz | 64-128 channels | ~200m | 3D point cloud, precise distance measurement |
| Radar | 10-20 Hz | Low | ~250m | Velocity measurement, all-weather operation |
| IMU | 100-200 Hz | N/A | N/A | Acceleration, rotation rates |
| GNSS/GPS | 1-10 Hz | ~2m accuracy | Global | Absolute positioning |
| Wheel Odometry | 50-100 Hz | N/A | N/A | Velocity, distance traveled |
openpilot's approach is notably camera-only (plus IMU). No LiDAR, no radar dependency. This mirrors Tesla's vision-only philosophy and is enabled by advances in neural network perception.
Autoware is sensor-agnostic but typically deploys with LiDAR + camera fusion, following the traditional robotics approach of redundant sensing modalities.
The comma 3X Hardwareopenpilot runs on the comma 3X, a windshield-mounted device with:
The device connects to the vehicle's CAN network through the OBD-II port, reading vehicle state and sending control commands.
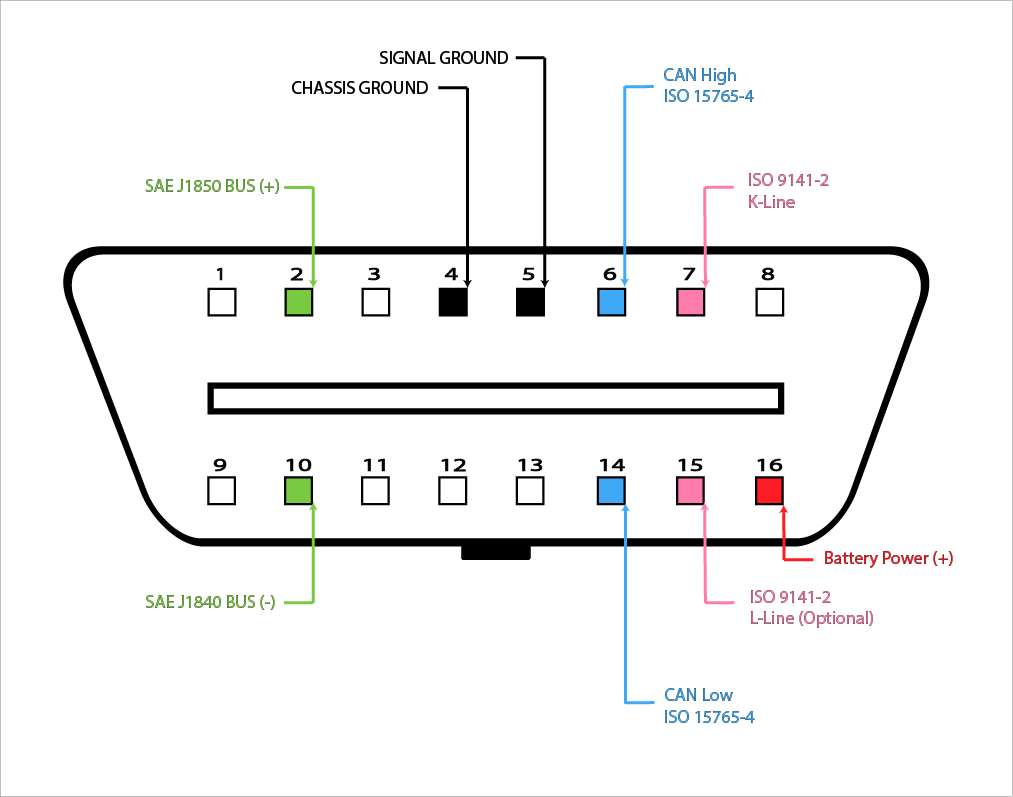
The Controller Area Network (CAN) bus is the nervous system of modern vehicles. Developed by Bosch in 1986, it's a multi-master serial bus where Electronic Control Units (ECUs) broadcast messages that any other ECU can receive.
CAN Message Structure┌─────────────┬──────────┬─────────────┬──────────┬─────────┐
│ Arbitration │ Control │ Data │ CRC │ ACK │
│ ID │ Field │ (0-8 bytes)│ Field │ Field │
│ (11/29 bit)│ │ │ │ │
└─────────────┴──────────┴─────────────┴──────────┴─────────┘A typical steering sensor message might look like:
ID: 0x14A (330 decimal)
Data: [0x00, 0x00, 0x0C, 0x80, 0x00, 0x00, 0x00, 0x00]
DBC (Database CAN) files define how to parse raw CAN bytes into meaningful values. From opendbc, here's a Honda steering sensor definition:
BO_ 330 STEERING_SENSORS: 8 EPS
 SG_ STEER_ANGLE : 7|16@0- (0.1,0) [-500|500] "deg" EON
 SG_ STEER_ANGLE_RATE : 23|8@0- (1,0) [-128|127] "deg/s" EON
 SG_ STEER_ANGLE_OFFSET : 39|8@0- (0.1,0) [-12.8|12.7] "deg" EON
This tells us:
STEER_ANGLE starts at bit 7, is 16 bits, big-endian, signed, scaled by 0.1openpilot's car interfaces parse CAN messages using generated code from DBC files:
# Simplified from openpilot's Honda interface
def update(self, can_packets):
    for cp in can_packets:
        # Parse steering angle from CAN message 0x14A
        self.steer_angle = cp.vl["STEERING_SENSORS"]["STEER_ANGLE"]

        # Parse vehicle speed from CAN message 0x158
        self.vehicle_speed = cp.vl["ENGINE_DATA"]["XMISSION_SPEED"] * CV.KPH_TO_MS

        # Parse brake pressure
self.brake_pressed = cp.vl["POWERTRAIN_DATA"]["BRAKE_PRESSED"] == 1To steer the car, openpilot sends torque commands over CAN. Here's the conceptual flow:
# Simplified steering control message construction
def create_steering_control(steer_torque, steer_req, counter):
    values = {
        "STEER_TORQUE": steer_torque,        # -3840 to 3840
        "STEER_TORQUE_REQUEST": steer_req,   # 1 = requesting control
        "COUNTER": counter,                   # Rolling counter for safety
        "CHECKSUM": 0,                        # Calculated separately
    }
    return packer.make_can_msg("STEERING_CONTROL", 0, values)
The torque value doesn't specify where to turn the wheel—it specifies how hard to push. The control system closes the loop by continuously adjusting torque based on the actual vs. desired steering angle.
Safety: The PandaThe panda is comma.ai's CAN interface with built-in safety. When powered on, it starts in SAFETY_SILENT mode—unable to send any CAN messages. To enable control:
# Safety modes prevent unauthorized actuation
panda.set_safety_mode(Panda.SAFETY_HONDA_NIDEC)
Each safety mode enforces vehicle-specific limits:
Before planning a path, the vehicle must know its precise position and orientation. GPS alone isn't sufficient—it's accurate to only ~2 meters and updates at just 1-10 Hz. Autonomous vehicles need centimeter-level accuracy at 100+ Hz.
Sensor Fusion with Extended Kalman FilterThe Extended Kalman Filter (EKF) fuses noisy measurements from multiple sensors into a coherent state estimate. It's the workhorse of robotics localization.
State vector (what we're estimating):
x = [position_x, position_y, position_z,
     velocity_x, velocity_y, velocity_z,
     orientation_roll, orientation_pitch, orientation_yaw,
     gyro_bias_x, gyro_bias_y, gyro_bias_z]
The EKF operates in two steps:
# Conceptual EKF implementation
class ExtendedKalmanFilter:
    def __init__(self):
        self.x = np.zeros(12)  # State vector
        self.P = np.eye(12)    # Covariance matrix

    def predict(self, imu_accel, imu_gyro, dt):
        # State transition using IMU
        # Integrate acceleration to get velocity
        # Integrate velocity to get position
        # Apply gyro rotation

        self.x = self.state_transition(self.x, imu_accel, imu_gyro, dt)

        # Update covariance (uncertainty grows)
        F = self.jacobian_of_transition(self.x, dt)
        self.P = F @ self.P @ F.T + self.Q  # Q = process noise

    def update(self, measurement, measurement_type):
        # Kalman gain determines how much to trust measurement
        H = self.measurement_jacobian(measurement_type)
        S = H @ self.P @ H.T + self.R  # R = measurement noise
        K = self.P @ H.T @ np.linalg.inv(S)

        # Correct state estimate
        y = measurement - self.measurement_model(self.x)  # Innovation
        self.x = self.x + K @ y
        self.P = (np.eye(12) - K @ H) @ self.P
openpilot's locationd service implements a PoseKalman filter fusing:
# From openpilot locationd - observation integration
def handle_sensors(self, sensor_time, sensor_type, measurement):
    if sensor_type == ObservationKind.PHONE_ACCEL:
        # Accelerometer at ~100Hz
        self.kf.predict_and_observe(sensor_time,
                                     ObservationKind.PHONE_ACCEL,
                                     measurement)

    elif sensor_type == ObservationKind.CAMERA_ODO_ROTATION:
        # Visual odometry at 20Hz - validate first
        if self.validate_rotation(measurement):
            self.kf.predict_and_observe(sensor_time,
                                         ObservationKind.CAMERA_ODO_ROTATION,
                                         measurement)
The filter weights measurements by uncertainty. GPS is accurate to 2m but drifts slowly. IMU is precise short-term but accumulates drift. The Kalman filter combines them optimally.
Autoware's Localization StackAutoware uses a more sophisticated approach with multiple algorithms:
// Autoware EKF localization node (simplified)
void EKFLocalizer::callbackPose(const PoseWithCovariance::SharedPtr msg) {
    // Measurement from NDT matching
    Eigen::VectorXd y = poseMsgToEigen(msg);
    Eigen::MatrixXd R = covarianceMsgToEigen(msg->covariance);

    // EKF update step
    ekf_.update(y, R, measurement_model_);
}

void EKFLocalizer::callbackIMU(const Imu::SharedPtr msg) {
    // Predict step at IMU rate
    Eigen::VectorXd u = imuMsgToEigen(msg);
    ekf_.predict(u, dt_);
}
Perception transforms raw sensor data into a semantic understanding of the environment: other vehicles, pedestrians, lane lines, traffic signs, drivable space.
The Two ParadigmsModular perception (Autoware, Apollo) separates tasks:
End-to-end perception (openpilot, Tesla FSD v12) uses a single neural network to output all driving-relevant information directly.
LiDAR Object Detection: PointPillars
For LiDAR-based systems, PointPillars is the standard architecture for real-time 3D object detection.
The problem: Point clouds are unordered and sparse. A 64-channel LiDAR produces ~100,000 points per scan, but they're not on a regular grid like image pixels.
PointPillars solution: Convert points into vertical columns ("pillars"), encode each pillar with a small PointNet, scatter to a 2D pseudo-image, then apply standard 2D convolutions.
# PointPillars architecture (simplified)
class PointPillars(nn.Module):
    def __init__(self):
        # Pillar Feature Net - encodes points within each pillar
        self.pfn = PillarFeatureNet(
            in_channels=9,  # x, y, z, intensity, x_c, y_c, z_c, x_p, y_p
            out_channels=64
        )

        # Backbone - 2D CNN on bird's eye view
        self.backbone = nn.Sequential(
            ConvBlock(64, 64, stride=1),
            ConvBlock(64, 128, stride=2),
            ConvBlock(128, 256, stride=2),
        )

        # Detection head - predicts boxes and classes
        self.head = DetectionHead(
            num_classes=3,  # car, pedestrian, cyclist
            num_anchors=2
        )

    def forward(self, pillars, coords):
        # Encode pillars
        features = self.pfn(pillars)  # (N, 64)

        # Scatter to pseudo-image
        pseudo_img = self.scatter(features, coords)  # (B, 64, H, W)

        # 2D backbone
        x = self.backbone(pseudo_img)

        # Detection
        return self.head(x)  # boxes, scores, classes
PointPillars runs at 62 Hz on a GPU—fast enough for real-time driving. VoxelNet, the predecessor, ran at just 4 Hz.
Camera Perception: Vision Transformersopenpilot's supercombo model processes camera images through a vision backbone followed by temporal aggregation.
Architecture evolution:
# Supercombo conceptual architecture
class Supercombo(nn.Module):
    def __init__(self):
        # Vision backbone - processes each frame
        self.backbone = FastViT_SA24()  # Hybrid CNN + Transformer

        # Feature Pyramid Network - multi-scale features
        self.fpn = BiFPN(channels=[64, 128, 256, 512])

        # Temporal aggregation - 5 seconds of context
        self.temporal = GRU(
            input_size=512,
            hidden_size=512,
            num_layers=1
        )

        # Output heads
        self.path_head = PathPredictionHead()      # Driving trajectory
        self.lane_head = LaneDetectionHead()       # Lane lines
        self.lead_head = LeadCarHead()             # Lead vehicle detection
        self.meta_head = MetaHead()                # Road type, etc.

    def forward(self, images, desire, traffic_convention):
        # images: (B, T, C, H, W) - batch of image sequences
        # desire: one-hot encoded driving intention
        # traffic_convention: left-hand vs right-hand drive

        B, T, C, H, W = images.shape

        # Extract features from each frame
        features = []
        for t in range(T):
            x = self.backbone(images[:, t])
            x = self.fpn(x)
            features.append(x)

        # Temporal aggregation
        features = torch.stack(features, dim=1)
        temporal_features, _ = self.temporal(features)

        # Predict outputs
        path = self.path_head(temporal_features[:, -1], desire)
        lanes = self.lane_head(temporal_features[:, -1])
        lead = self.lead_head(temporal_features[:, -1])

return path, lanes, leadInput: Two consecutive 256×512 RGB images at 20 Hz, plus:
Output:
Tesla introduced a fundamentally different output representation in 2022: instead of detecting discrete objects with bounding boxes, predict occupancy of 3D space.
# Occupancy Network output (conceptual)
class OccupancyOutput:
    # 3D grid of occupancy probabilities
    occupancy_volume: Tensor  # (X, Y, Z) = (256, 256, 16)

    # Per-voxel velocity vectors
    occupancy_flow: Tensor    # (X, Y, Z, 3)

    # Semantic labels per voxel
    semantics: Tensor         # (X, Y, Z, num_classes)
Traditional object detection fails on novel objects (construction debris, fallen trees, animals). If the network wasn't trained on it, it won't detect it. Occupancy networks predict "something is here" regardless of object class.
Given localization and perception, the planner must generate a safe, comfortable trajectory to the goal.
Path Planning HierarchyMost systems use a hierarchical approach:
MPC is the dominant approach for trajectory optimization. It solves an optimization problem at each timestep:
# MPC formulation (conceptual)
def solve_mpc(current_state, reference_trajectory):
    """
    Minimize: Σ (x_t - x_ref)² + (u_t)²
    Subject to:
        x_{t+1} = f(x_t, u_t)   # Vehicle dynamics
        u_min ≤ u_t ≤ u_max    # Actuator limits
        x_t ∈ X_safe           # Collision avoidance
    """

    # State: [x, y, heading, velocity]
    # Control: [steering_angle, acceleration]

    N = 50  # Prediction horizon (e.g., 5 seconds at 10Hz)

    # Build optimization problem
    x = cp.Variable((4, N+1))
    u = cp.Variable((2, N))

    cost = 0
    constraints = [x[:, 0] == current_state]

    for t in range(N):
        # Tracking cost
        cost += cp.quad_form(x[:, t] - reference_trajectory[:, t], Q)

        # Control effort cost
        cost += cp.quad_form(u[:, t], R)

        # Dynamics constraint (bicycle model)
        constraints += [x[:, t+1] == vehicle_dynamics(x[:, t], u[:, t])]

        # Actuator constraints
        constraints += [u[0, t] >= -max_steer, u[0, t] <= max_steer]
        constraints += [u[1, t] >= -max_decel, u[1, t] <= max_accel]

    problem = cp.Problem(cp.Minimize(cost), constraints)
    problem.solve()

    return u[:, 0].value  # Return first control action
MPC re-plans at every timestep. If conditions change (car cuts in front), the next solve incorporates the new information.
openpilot's Approach: Learned Planningopenpilot 0.10 removed MPC entirely. Instead, the neural network directly outputs the desired trajectory, supervised during training by a "World Model" that simulates future outcomes.
# openpilot 0.10 planning (simplified)
def plan(self, model_output):
    # Neural network directly outputs trajectory
    # No optimization, no MPC—just network inference

    path = model_output.path  # 33 points over 10 seconds

    # Trajectory is (x, y) positions in vehicle frame
    # Already accounts for:
    # - Current speed
    # - Desired lane position
    # - Lead vehicle following
    # - Comfort constraints (learned from human drivers)

    return path
This is the "end-to-end" philosophy: train a network to directly map sensor inputs to control outputs, learning the entire pipeline implicitly.
The control layer translates the planned trajectory into actual steering, throttle, and brake commands.
Lateral Control: SteeringPID Controller: The classic approach. Minimize cross-track error (distance from desired path).
class PIDLateralController:
    def __init__(self, kp=0.15, ki=0.0001, kd=1.0):
        self.kp = kp  # Proportional gain
        self.ki = ki  # Integral gain
        self.kd = kd  # Derivative gain

        self.integral = 0
        self.prev_error = 0

    def update(self, cross_track_error, dt):
        # P term: proportional to current error
        p_term = self.kp * cross_track_error

        # I term: accumulated error over time
        self.integral += cross_track_error * dt
        i_term = self.ki * self.integral

        # D term: rate of change of error
        derivative = (cross_track_error - self.prev_error) / dt
        d_term = self.kd * derivative

        self.prev_error = cross_track_error

        # Steering command
        steering = -(p_term + i_term + d_term)
        return np.clip(steering, -1.0, 1.0)
Why torque, not angle? At the actuator level, electric power steering (EPS) systems accept torque commands, not position commands. The PID loop runs at 100 Hz, continuously adjusting torque to track the desired steering angle.
openpilot's Control Loopopenpilot's controlsd runs at 100 Hz:
# From openpilot controlsd (simplified)
class Controls:
    def __init__(self):
        self.LaC = LatController()   # Lateral (steering)
        self.LoC = LongController()  # Longitudinal (speed)

    def control_loop(self):
        while True:
            # 1. Read current state
            self.update()  # From CAN bus and sensors

            # 2. Compute control commands
            steering_torque = self.LaC.update(
                self.desired_curvature,
                self.current_curvature,
                self.vehicle_speed
            )

            accel_command = self.LoC.update(
                self.desired_speed,
                self.current_speed,
                self.lead_car
            )

            # 3. Send commands to vehicle
            self.publish_controls(steering_torque, accel_command)

            # 4. Maintain 100Hz rate
self.rate_keeper.keep_time()Adaptive Cruise Control (ACC) manages speed and following distance. The controller must balance:
class LongitudinalController:
    def __init__(self):
        self.pid = PIDController(kp=1.0, ki=0.1, kd=0.0)

    def update(self, desired_speed, current_speed, lead_car):
        if lead_car.detected:
            # Following mode: maintain time gap
            desired_gap = self.time_gap * current_speed
            current_gap = lead_car.distance

            # Adjust desired speed based on gap error
            gap_error = current_gap - desired_gap
            speed_adjustment = self.gap_pid.update(gap_error)
            target_speed = min(desired_speed,
                              lead_car.speed + speed_adjustment)
        else:
            # Cruising mode: track desired speed
            target_speed = desired_speed

        # PID on speed error
        speed_error = target_speed - current_speed
        accel_command = self.pid.update(speed_error)

return np.clip(accel_command, -3.0, 2.0) # m/s²Autonomous driving is a hard real-time system. Missing a control deadline can cause an accident. This demands specialized operating systems and architectures.
QNX: The Industry StandardQNX Neutrino RTOS runs in over 275 million vehicles worldwide. Its microkernel architecture isolates every component:
┌─────────────────────────────────────────────────────────┐
│                     Applications                        │
├─────────────────────────────────────────────────────────┤
│  Perception  │  Planning  │  Control  │  Diagnostics   │
├─────────────────────────────────────────────────────────┤
│                    POSIX API                            │
├─────────────────────────────────────────────────────────┤
│  Network  │  Filesystem  │  Device Drivers  │  IPC     │
├─────────────────────────────────────────────────────────┤
│              QNX Neutrino Microkernel                   │
│        (Only kernel code runs in kernel space)          │
└─────────────────────────────────────────────────────────┘
If a driver or service crashes, it can be restarted without affecting the kernel or other services. In a monolithic kernel (Linux), a driver crash takes down the entire system.
QNX is certified to ISO 26262 ASIL D—the highest automotive safety level.
AUTOSAR: Standardized ArchitectureAUTOSAR (AUTomotive Open System ARchitecture) provides a standardized software architecture for ECUs:
┌─────────────────────────────────────────────────────────┐
│              Application Software                       │
├─────────────────────────────────────────────────────────┤
│              Runtime Environment (RTE)                  │
├─────────────────────────────────────────────────────────┤
│  Services  │  ECU Abstraction  │  Complex Drivers      │
├─────────────────────────────────────────────────────────┤
│                 Microcontroller Abstraction             │
├─────────────────────────────────────────────────────────┤
│                     Microcontroller                     │
└─────────────────────────────────────────────────────────┘
Adaptive AUTOSAR runs on POSIX-compliant systems (QNX, Linux with PREEMPT_RT) and supports:
openpilot runs on Android (Linux kernel) without hard real-time guarantees. It compensates with:
# From openpilot ratekeeper
class Ratekeeper:
    def __init__(self, rate, print_delay_threshold=None):
        self.rate = rate
        self.interval = 1.0 / rate
        self.print_delay_threshold = print_delay_threshold

    def monitor_time(self):
        current = time.monotonic()
        remaining = self.next_frame - current

        if remaining < 0:
            # Missed deadline
            if self.print_delay_threshold is not None:
                if -remaining > self.print_delay_threshold:
                    print(f"Control loop late by {-remaining*1000:.1f}ms")

        # Sleep until next frame
        if remaining > 0:
            time.sleep(remaining)

self.next_frame += self.intervalComponents in the autonomous stack must communicate efficiently. Two dominant approaches:
ROS 2 (Autoware)ROS 2 uses DDS (Data Distribution Service) for publish-subscribe messaging with QoS guarantees:
// Autoware-style ROS 2 node
class PerceptionNode : public rclcpp::Node {
public:
    PerceptionNode() : Node("perception_node") {
        // Subscribe to point cloud from LiDAR driver
        lidar_sub_ = create_subscription<PointCloud2>(
            "/lidar/points",
            rclcpp::SensorDataQoS(),
            [this](PointCloud2::SharedPtr msg) {
                process_lidar(msg);
            }
        );

        // Publish detected objects
        objects_pub_ = create_publisher<DetectedObjects>(
            "/perception/objects",
            rclcpp::QoS(10)
        );
    }

private:
    void process_lidar(PointCloud2::SharedPtr cloud) {
        auto objects = detector_.detect(cloud);
        objects_pub_->publish(objects);
    }
};
ROS 2 provides real-time capabilities through:
openpilot uses a lightweight custom system: ZeroMQ for pub-sub, Cap'n Proto for serialization.
# openpilot messaging
import cereal.messaging as messaging

# Publisher
pm = messaging.PubMaster(['carState', 'carControl'])

while True:
    car_state = get_car_state()
    pm.send('carState', car_state)

# Subscriber
sm = messaging.SubMaster(['modelV2', 'carState', 'controlsState'])

while True:
    sm.update()
    if sm.updated['modelV2']:
        path = sm['modelV2'].position
openpilot's MSGQ (message queue) previously allocated 10MB per service, growing to 711MB total. A 2024 optimization reduced this to 90MB with per-service configurable buffers.
Camera → Object Detection → Tracking → Prediction → Planning → Control
         ↓
LiDAR  → Point Cloud Processing →
         ↓
Radar  → Sensor Fusion →
Each module is trained/tuned independently. Errors compound through the pipeline.
End-to-End LearningTesla's FSD v12 and openpilot 0.10 collapse this into:
Cameras → Neural Network → ControlWhat this means technically:
openpilot 0.10 training uses a "World Model" that predicts future states:
# Conceptual training loop
def train_step(images, human_trajectory):
    # Forward pass through driving model
    predicted_trajectory = model(images)

    # World model simulates consequences of predicted trajectory
    simulated_future = world_model.simulate(predicted_trajectory)

    # Loss: how close is simulated future to actual future?
    loss = trajectory_loss(predicted_trajectory, human_trajectory)
    loss += collision_loss(simulated_future)
    loss += comfort_loss(predicted_trajectory)

    loss.backward()
optimizer.step()| Aspect | Modular | End-to-End |
|---|---|---|
| Interpretability | High—can inspect each module | Low—black box |
| Data requirements | Moderate | Massive (Tesla: 1.5 PB) |
| Handling edge cases | Explicit rules | Must be in training data |
| Development iteration | Slow (retest each module) | Fast (retrain model) |
| Compute requirements | Distributed across ECUs | Centralized GPU |
Here's the complete data flow for openpilot processing a single frame:
1. CAMERA CAPTURE (visionipc)
   ├── Road camera: 1164x874 @ 20Hz
   └── Driver camera: 1152x864 @ 20Hz

2. PERCEPTION (modeld)
   ├── Input: 2 consecutive frames + state
   ├── Model: FastViT + GRU (supercombo)
   ├── Output: path, lanes, leads, road edges
   └── Latency: ~25ms on comma 3X

3. LOCALIZATION (locationd)
   ├── Input: IMU @ 100Hz, camera odo @ 20Hz, GPS @ 1Hz
   ├── Algorithm: Extended Kalman Filter
   ├── Output: position, velocity, orientation
   └── Latency: <1ms per update

4. PLANNING (plannerd)
   ├── Input: model output, localization, map
   ├── Algorithm: Neural network (no MPC in 0.10)
   └── Output: desired trajectory

5. CONTROL (controlsd) @ 100Hz
   ├── Input: desired trajectory, vehicle state
   ├── Lateral: torque-based PID on curvature
   ├── Longitudinal: PID on speed/distance
   └── Output: steering torque, acceleration

6. ACTUATION (pandad)
   ├── Input: control commands
   ├── Safety checks: rate limits, watchdog
   └── Output: CAN messages to vehicle
Total latency from camera to wheel: ~100ms
This is fast enough because the system predicts 10 seconds ahead. By the time the prediction executes, it's still valid.
End-to-end learning is replacing hand-crafted modules. Vision is replacing LiDAR. Foundation models trained on internet-scale data are entering the loop.
The fundamentals remain: sense the world, understand it, plan a path, execute it safely. The implementations change; the problem doesn't.
| # | Наименование новости | Тональность | Информативность | Дата публикации |
|---|---|---|---|---|
| 1 | What Every Python Developer Should Know About the CPython ABI | 0 | 10 | 19-07-2026 |
| 2 | Объяснение лямбда исчисления через Python | 0 | 7.94 | 22-04-2026 |
| 3 | Практики разработки на Python | 0 | 5.95 | 29-03-2026 |
| 4 | build-your-own-openclaw - A step-by-step guide to build your own AI agent. | 0 | 28.18 | 02-06-2026 |
| 5 | Run Modified Python Code Using the AST Module | 0 | 8.31 | 27-06-2026 |
| 6 | Как мы укротили сложный процесс с помощью CQRS и стейт-машин | 0 | 9.13 | 02-06-2026 |
| 7 | 2026 Industry 4.0 Implementation Guide: Framework & Examples | 5 | 8 | 23-05-2026 |
| 8 | Гараж и автомобиль: как организовать пространство, экономить на обслуживании и избежать типичных ошибок | 5 | 8 | 01-01-1970 |
| 9 | Cloud-based platform pinpoints delays across complex autonomous-driving software | 0 | 20.9 | 03-10-2026 |
| 10 | Как лгать машине. Разбираем принципы работы полиграфа и способы обойти проверку | 0 | 8.88 | 15-04-2026 |